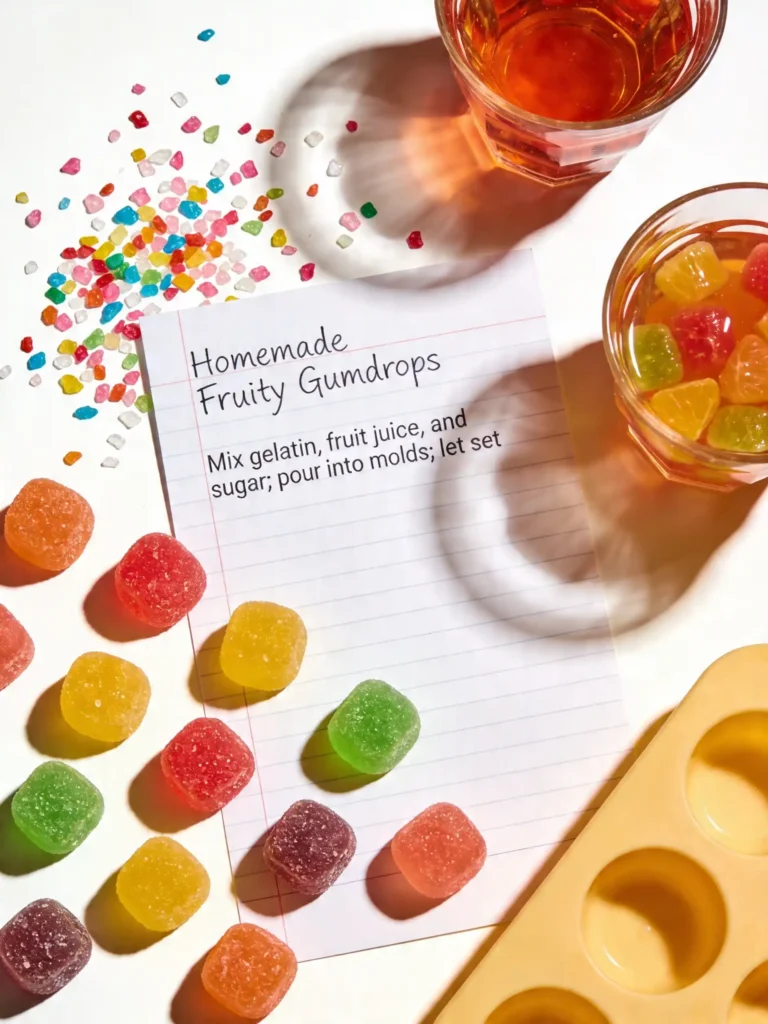
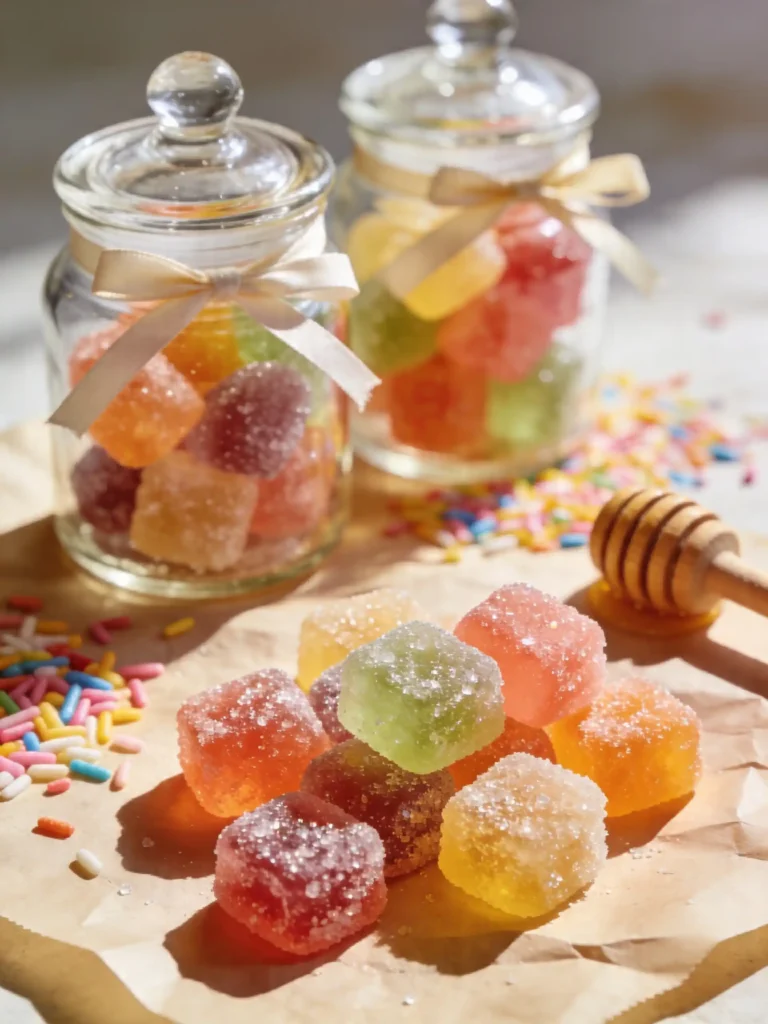
Fruity Homemade Gumdrops are one of the most satisfying candies you can make in your own kitchen. They look cheerful, taste bright, and give you real fruit flavor without relying on artificial colors or mystery ingredients.
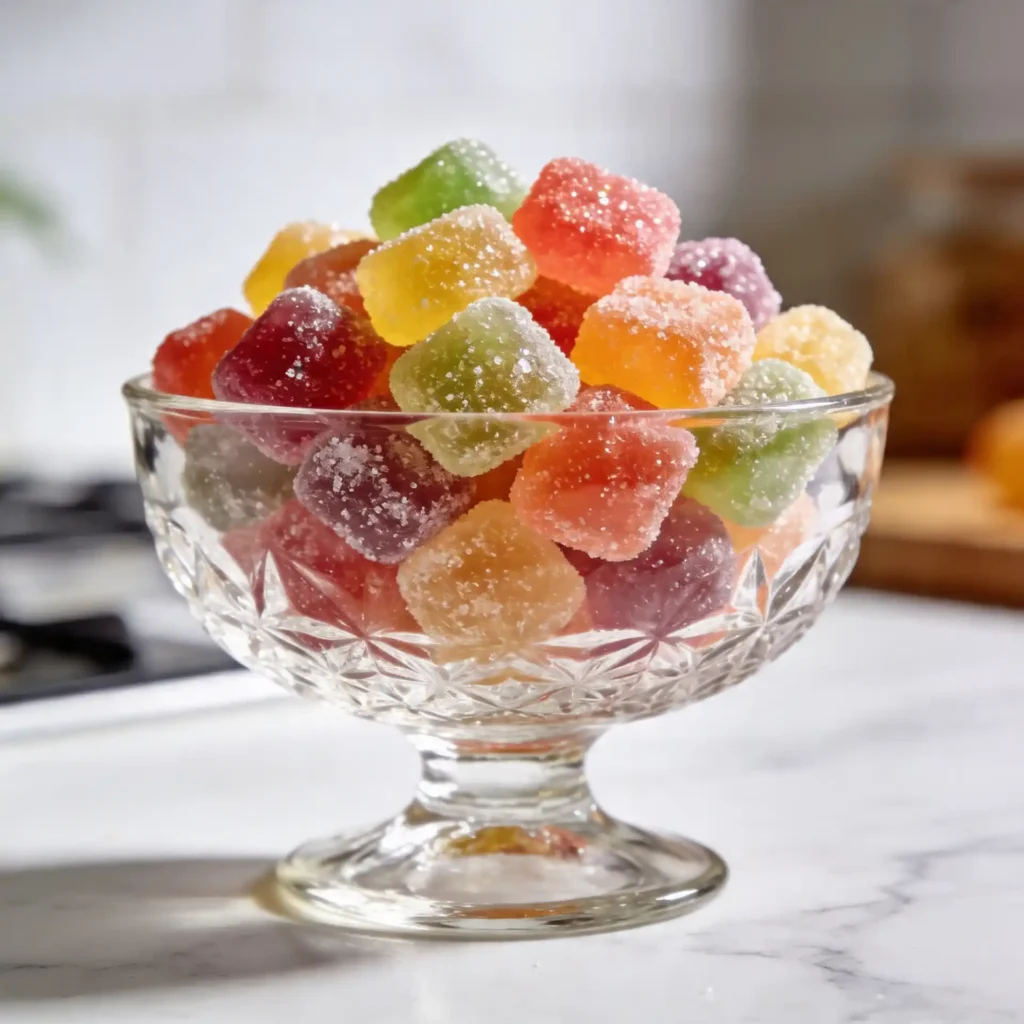
What makes Fruity Homemade Gumdrops so special is the texture. They start soft and glossy, then finish with that light sugar crust that makes each piece feel classic, nostalgic, and just a little fancy.
I love recipes like this because they feel playful without being complicated. Fruity Homemade Gumdrops turn basic pantry ingredients and fruit juice into candy that looks gift-worthy, party-ready, and much more special than a bag from the store.
Hi, I’m Chef Adriana, and I always enjoy old-fashioned sweets that feel simple enough for a real home kitchen. Fruity Homemade Gumdrops fit that style perfectly because they are colorful, fun to cut, and easy to adapt once you understand the set and drying process.
The first time I made a batch, I remember being surprised by how much better the flavor tasted when real juice led the recipe. The color looked softer and prettier, and the candy felt more homemade in the best way.
If you love making old-fashioned confections from scratch, you should also try our homemade english toffee recipe. It brings that same homemade candy satisfaction in a buttery, crisp direction instead of a chewy one.
Table of Contents
Table of Contents
Why Fruity Homemade Gumdrops Beat Store-Bought Candy
The Power of Real Fruit Juice Over Artificial Dyes
Fruity Homemade Gumdrops stand out because they taste like actual fruit instead of anonymous sweetness with bright coloring. Real juice gives the candy a cleaner flavor, a softer finish, and a more natural look that still feels festive.
That matters more than people think. Many store-bought gumdrops lead with sugar first and fruit flavor second, while Fruity Homemade Gumdrops can actually reflect the juice you choose.
Grape juice gives a deeper, jammy flavor. Pomegranate juice tastes richer and more grown-up, while berry juices make the candy feel bright and cheerful without being one-note.
I like this approach because the candy does not need intense artificial coloring to feel pretty. The natural shades from juice still make Fruity Homemade Gumdrops look attractive in a bowl, especially when they are finished with sparkling sugar.
That homemade look is part of the charm. The candies feel real, slightly rustic, and much more personal than a glossy bag from the candy aisle.
Real juice also lets you create flavor sets that feel more interesting. Instead of one generic “fruit” taste, Fruity Homemade Gumdrops can reflect whatever juice you truly enjoy.
Why Homemade Candy Feels More Special
Homemade candy always carries a little more personality. Fruity Homemade Gumdrops show that clearly because each batch reflects your flavor choice, your mold, your cut style, and the way you finish the sugar coating.
That makes them ideal for gifts, dessert trays, or holidays. They look thoughtful, and people usually notice right away that they are not standard store candy.
I also appreciate that you do not need a complicated candy thermometer for this recipe. Fruity Homemade Gumdrops depend more on the right boil time, the gelatin set, and the curing step than on precision sugar-stage candy work.
That makes them more approachable than many people expect. Once you understand the steps, the process feels simple and repeatable.
The best part is how flexible they are. Fruity Homemade Gumdrops can lean tart, floral, berry-rich, or citrusy depending on what you pour into the pan.
Why Trust This Recipe
Chef Adriana focuses on homemade sweets that feel approachable, look polished, and deliver classic candy results without unnecessary complication.
Essential Ingredients for the Perfect Chew
Choosing the Best Juices and Which Fruits to Avoid
Juice choice shapes the entire personality of Fruity Homemade Gumdrops. Some juices set beautifully and bring bold flavor, while others create texture problems because of the enzymes they carry.
Grape juice, pomegranate juice, cherry juice, and many berry blends work especially well. They bring strong color and enough flavor to hold up once sugar and gelatin enter the mix.
Citrus juices can work too, but they often benefit from blending with another fruit so the flavor does not turn too sharp. Fruity Homemade Gumdrops need a pleasant balance between sweetness and brightness, not a harsh sour edge.
The tricky fruits are fresh pineapple, kiwi, papaya, and sometimes fresh mango. These fruits contain enzymes that can break down gelatin and prevent the candy from setting properly.
That is where a lot of candy confusion begins. People assume all fruit juice behaves the same, but some juices actively interfere with the protein bonds that gelatin needs in order to hold shape.
Fresh pineapple contains bromelain, and kiwi contains actinidin. Those enzymes damage the gelatin structure, so fresh versions of those fruits can leave Fruity Homemade Gumdrops loose or unset.
That does not mean those flavors are forbidden forever. It simply means you need processed juice, cooked fruit, or a different setting agent if you want those tropical directions.
Here is a helpful juice chart:
| Juice Type | Best or Worst | Why It Matters |
|---|---|---|
| Pomegranate or Grape | Best | Strong flavor, good color, reliable gelatin set |
| Cherry or Berry Juice | Best | Bright flavor and easy candy-friendly balance |
| Fresh Pineapple or Papaya | Worst | Enzymes interfere with gelatin and weaken the set |
If you still want to work with tropical flavors more safely, explore our pineapple ginger mocktail. It gives you that bright fruit energy without the gelatin-setting problem.
For another colorful fruit-forward dessert, check out our beautiful strawberry pizza. It brings the same playful, party-ready feeling in a very different texture.
Print
Fruity Homemade Gumdrops
- Total Time: 20 minutes, plus 4 hours chilling and 24 hours curing
- Yield: 40 small gumdrops 1x
Description
Fruity Homemade Gumdrops are a bright, chewy candy made with real juice, gelatin, sugar, and a sparkling sugar coating for an old-fashioned homemade treat.
Ingredients
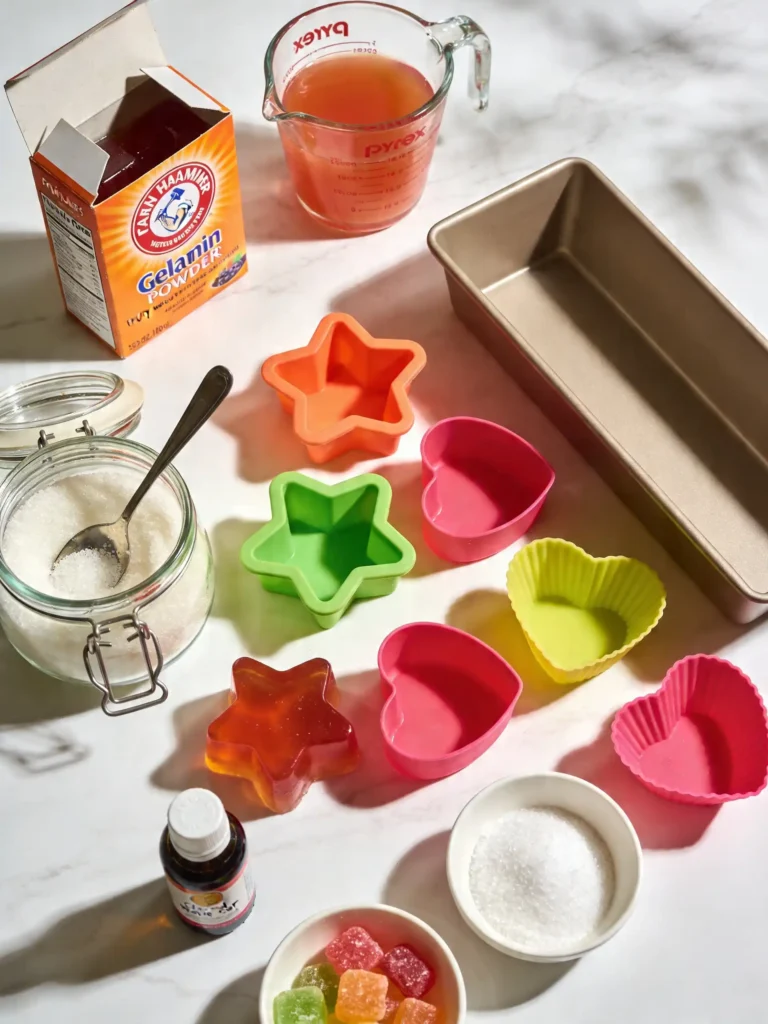
- 2 cups fruit juice such as grape, pomegranate, cherry, or berry juice
- 4 tablespoons unflavored gelatin
- 1 1/2 cups granulated sugar
- Extra granulated sugar for coating
- Light oil or parchment for pan prep
Instructions
- Lightly oil a silicone mold or line a loaf pan with parchment paper.
- Pour 1/2 cup of the juice into a bowl and sprinkle the gelatin over it.
- Let the gelatin bloom for 5 minutes.
- In a saucepan, combine the remaining juice and the sugar.
- Heat over medium heat until the sugar fully dissolves.
- Add the bloomed gelatin and whisk until smooth.
- Bring the mixture to a gentle boil.
- Boil for 5 minutes, stirring often.
- Remove from the heat and pour into the prepared mold or pan.
- Chill for 4 hours or until fully firm.
- Unmold or cut into small squares.
- Let the candies cure on a wire rack at room temperature for 24 hours.
- Toss the cured gumdrops in granulated sugar and store in an airtight container.
Notes
Do not use fresh pineapple or kiwi juice with standard gelatin because the enzymes can prevent the candy from setting.
The 24-hour room temperature curing step is necessary if you want the sugar coating to stay dry and crisp.
A loaf pan works well if you do not have silicone molds.
A small dropper helps fill detailed molds more neatly.
- Prep Time: 15 minutes
- Cook Time: 5 minutes
- Category: Candy
- Method: Stovetop / Chill / Cure
- Cuisine: American
Nutrition
- Serving Size: Per 1 gumdrop
- Calories: 25 kcal
- Sugar: 6g
- Sodium: 5mg
- Carbohydrates: 6g
Blooming the Gelatin for a Smooth Set
Blooming gelatin is one of the most important parts of Fruity Homemade Gumdrops. This step means sprinkling the gelatin into cool juice and giving it time to absorb moisture before heat enters the mixture.
That short wait changes everything. Properly bloomed gelatin dissolves more smoothly and gives the candy a more even, glossy finish.
If you rush it, lumps can form. Those lumps do not always disappear later, which is why Fruity Homemade Gumdrops need a calm start before the pot ever goes on the stove.
I like to think of blooming as insurance. It helps the texture stay smooth, the set stay consistent, and the final candy look more polished.
The juice should be cool or room temperature when the gelatin first goes in. If the liquid is too warm, the gelatin can clump before it hydrates properly.
That is one of those small technical details that separates a good candy batch from a frustrating one. Fruity Homemade Gumdrops reward patience at the start.
Step-by-Step Candy Making Process
Boiling the Sugar Syrup to the Right Consistency
Once the gelatin has bloomed, the next step is heating the mixture with sugar until it becomes smooth and glossy. Fruity Homemade Gumdrops do not require a candy thermometer, but they do need the right short boil so the texture lands properly.
A steady simmer followed by a brief boil is usually enough. You are not taking the syrup to a brittle candy stage, but you are giving it enough heat to fully dissolve the sugar and strengthen the final chew.
That short boil matters because it affects body and texture. Fruity Homemade Gumdrops should feel soft and chewy, not like loose jelly or firm taffy.
I usually watch the surface more than anything else. When the syrup looks smooth, fully dissolved, and lightly glossy, it is ready to move.
This is not a long-cooking candy. Five minutes of steady boiling is usually the sweet spot for a clean, dependable result.
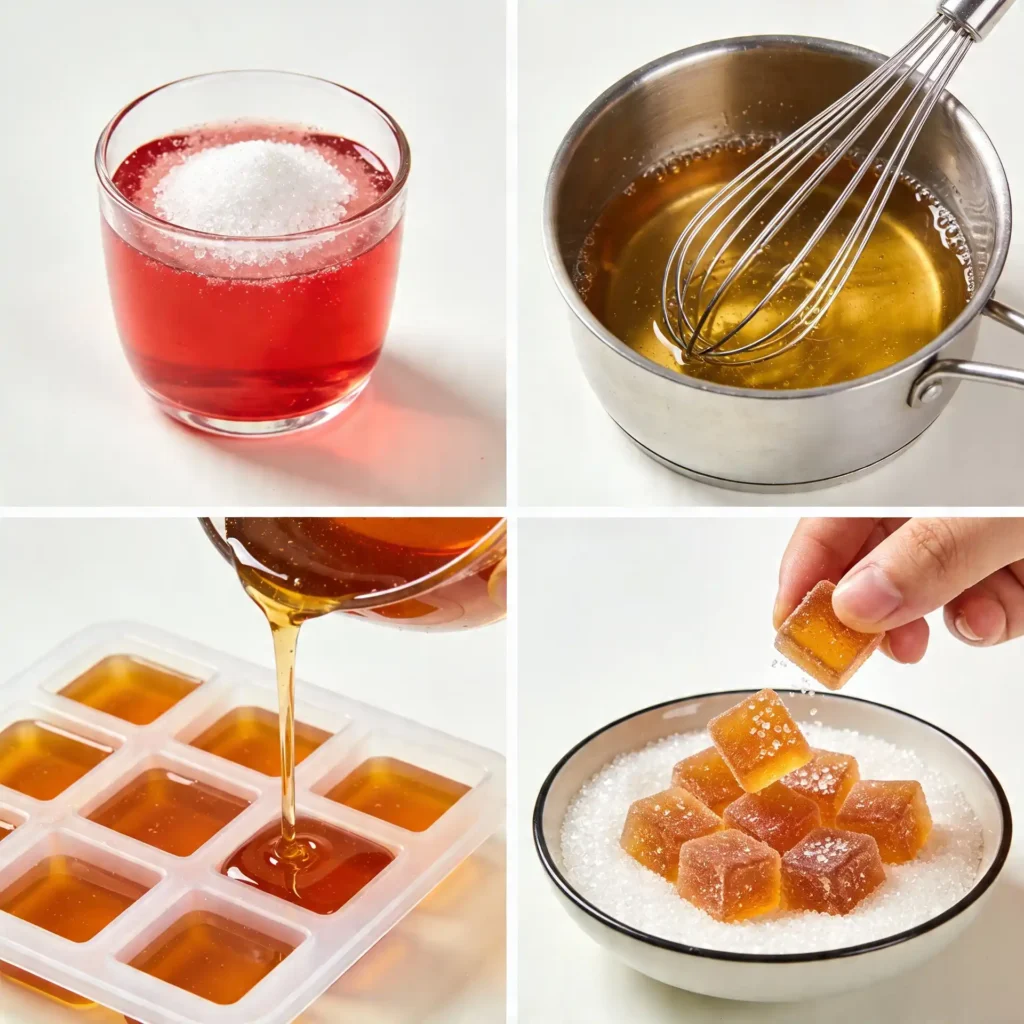
Pouring Into Silicone Molds vs. the Loaf Pan Method
Fruity Homemade Gumdrops can go into silicone molds for shaped candies or into a loaf pan for later cutting. Both methods work well, but they give different experiences once the mixture is ready.
Silicone molds are fun for small shapes, holiday pieces, and gift boxes. They also make the finished candies look especially polished.
The loaf pan method is simpler if you want classic gumdrop cubes or diamonds. It is also much faster when you are making one large batch and do not want to fill dozens of tiny cavities.
Chef’s Note: Use a medicine dropper or a small culinary syringe to fill intricate silicone molds without making a sticky mess. That small trick keeps Fruity Homemade Gumdrops much neater during the pour.
Here is the full method:
- Lightly oil a silicone mold or line a small loaf pan with parchment.
- Pour part of the juice into a bowl and sprinkle the gelatin over it to bloom.
- Let the gelatin sit for 5 minutes until thick and sponge-like.
- In a saucepan, combine the remaining juice and sugar.
- Warm the mixture over medium heat until the sugar dissolves fully.
- Add the bloomed gelatin and whisk until completely smooth.
- Bring the mixture to a gentle boil.
- Boil for 5 minutes, stirring often enough to keep the mixture even.
- Remove the pan from the heat and skim any foam if needed.
- Carefully pour the hot candy into molds or into the prepared loaf pan.
- Chill the candy for about 4 hours until fully firm.
- Unmold or cut into squares once set.
- Let the pieces cure before coating them in sugar.
That curing step matters just as much as the cooking. Fruity Homemade Gumdrops are not truly finished the moment they leave the refrigerator.
If you want more practice with setting gelatin desserts cleanly, our viral 4th of july jello cake is another great recipe to try. It teaches the same patience with texture and timing.
For another easy holiday sweet that feels gift-ready, whip up a batch of our crockpot christmas candy. It is different from gumdrops, but it offers that same satisfying homemade candy appeal.
The Crucial Curing Process
Why Your Sugar Coating Is Melting
One of the biggest mistakes people make with Fruity Homemade Gumdrops is adding sugar too soon. If the candies go straight from the fridge into a sugar coating, the surface still holds too much moisture and the sugar starts dissolving almost immediately.
That creates a wet, sticky finish instead of a sparkling candy shell. The gumdrops may still taste fine, but they will not have that classic old-fashioned look and feel.
Fruity Homemade Gumdrops need time to dry on the outside before the sugar goes on. That drying stage is what allows the coating to cling instead of melting.
This is where patience matters more than anything else. The candy may already be set, but it is not yet cured.
A lot of homemade candy problems are really timing problems. The gumdrops are ready to cut long before they are ready to coat.
Letting the Candies Air Dry Properly
Once cut or unmolded, Fruity Homemade Gumdrops need to sit at room temperature on a wire rack for about 24 hours. This curing step helps the outer surface lose enough moisture to accept the sugar coating properly.
That air-drying stage changes the texture in a very helpful way. The outside becomes slightly tacky but not wet, and that is exactly what you want before rolling the pieces in sugar.
I like to place the candies on parchment or a wire rack with a little space between them. Good airflow helps the surface firm up more evenly.
This is also the stage where the candies start feeling more like real gumdrops and less like cold gelatin cubes. Fruity Homemade Gumdrops become more polished after that room-temperature rest.
Here is a quick troubleshooting chart:
| Problem | Likely Cause | Solution |
|---|---|---|
| Sugar coating dissolves | Candies were coated too soon | Cure for 24 hours first |
| Lumpy texture | Gelatin was not bloomed smoothly | Whisk the gelatin well while blooming |
Need more make-ahead edible gifts? Try our peppermint oreo white chocolate bark. It gives you another fun candy-style project that packages beautifully.
Dietary Swaps and Flavor Variations
How to Make Vegan Gumdrops With Agar-Agar
If you want a vegan version of Fruity Homemade Gumdrops, agar-agar is the usual swap for gelatin. It sets differently, though, so you should expect a firmer, less elastic texture than the classic chew you get from gelatin.
That difference matters because agar candies do not behave exactly like traditional gumdrops. The set is usually cleaner and firmer, while gelatin-based Fruity Homemade Gumdrops feel softer and bouncier.
I still think agar can work beautifully if you understand the trade-off. It is not wrong, just different, and some people actually prefer the firmer bite.
Agar also usually needs a stronger boil to activate properly. That means you should follow a formula designed for agar instead of simply swapping it one-for-one with gelatin.
Adding Citric Acid for a Sour Kick
Citric acid is a fun way to change the final candy without changing the whole recipe. A little mixed into the sugar coating gives Fruity Homemade Gumdrops a brighter, tangier finish that feels more like classic sour candy.
This works especially well with berry, grape, cherry, and pomegranate juices. The tart edge sharpens the fruit flavor and keeps the sugar coating from feeling flat.
I like using a light hand here. Fruity Homemade Gumdrops should still taste fruity first, not like sour powder candy unless that is the specific goal.
You can also play with layered coatings. Some pieces can stay plain sugar-coated, while others can get the citric acid mix for variety.
For a completely different tangy snack profile, crunch on our low carb pickled celery snacks. If you prefer naturally sweet fruit blends, blend up our bright dragon fruit smoothie.
Cool down your palate after candy-making with our refreshing watermelon sorbet recipe. It makes a light and cheerful contrast to the chewy candy texture.
Frequently Asked Questions
Why is my sugar coating melting on the gumdrops?
The candies were likely rolled in sugar before they had time to cure. Fruity Homemade Gumdrops need about 24 hours of air drying so the outer surface is ready for the coating.
Can I use fresh pineapple or kiwi juice?
Fresh pineapple and kiwi are poor choices for standard gelatin-based Fruity Homemade Gumdrops because their enzymes can prevent the gelatin from setting properly. Use processed juice or a different formula if you want those flavors.
Can I make these gumdrops vegan?
Yes, but you will need agar-agar instead of gelatin. The finished texture will be firmer than classic Fruity Homemade Gumdrops.
Do I need a candy thermometer for this recipe?
No. Fruity Homemade Gumdrops rely more on bloom, a short controlled boil, chilling, and curing than on advanced sugar-stage cooking.
How long do homemade gumdrops last?
Fruity Homemade Gumdrops keep best in an airtight container once fully cured and coated. Their texture is usually best when they are stored in a cool, dry place rather than somewhere humid.
What is the difference between pectin and gelatin?
Gelatin creates a chewy, elastic texture, while pectin usually creates a more jelly-like fruit candy texture. Fruity Homemade Gumdrops traditionally use gelatin for that classic bounce and chew.
Conclusion
Fruity Homemade Gumdrops prove that homemade candy can be colorful, nostalgic, and surprisingly approachable. With real juice, properly bloomed gelatin, a short boil, and the all-important curing stage, you get candies that look classic and taste much better than most store versions.
The key is respecting the process. Let the juice choice support the set, let the gelatin bloom fully, and let the finished candies dry before sugar coating them.
Once you make a batch, Fruity Homemade Gumdrops become one of those kitchen projects you want to repeat with new flavors and shapes. Balance out your sweet tooth by prepping a batch of our savory, crunchy homemade spicy chili crisp for your pantry.
Ready to upgrade your home cooking? 👉 Join my Facebook community: Chef Adriana on Facebook for easy recipes and pro tips!