S’mores Cookie Cups are the ultimate way to enjoy that nostalgic campfire flavor without the sticky mess. These bite-sized treats combine graham cracker cookie dough, gooey marshmallows, and rich chocolate into a dessert you can bake right in your oven. Perfect for parties, after-school snacks, or cozy nights in, they’re a creative twist on the classic S’more.
In this guide, you’ll learn how to make S’mores Cookie Cups from scratch, discover pro tips for perfect results, and explore fun variations to keep your baking exciting. We’ll also answer some of the most common questions about these sweet treats so you can master them at home.
Table of Contents
Table of Contents
Looking for more dessert inspiration? Try our Slutty Brownie Ice Cream Sandwiches for another gooey, chocolatey treat.
Introduction to S’mores Cookie Cups
The Origin of S’mores and Why Cookie Cups Are Trending
The classic S’more, featuring toasted marshmallows and melted chocolate between graham crackers, has been an American favorite for over 100 years. Traditionally enjoyed around campfires, they’re simple, delicious, and unforgettable.
Cookie cups are the modern evolution of this treat. Instead of balancing sticky marshmallows and melting chocolate, all the flavors are baked together in a convenient cup shape. They’re gaining popularity on social media because they’re adorable, portable, and perfect for entertaining.
For another fun party dessert, check out our Buckeye Rice Krispie Treats, which combine chocolate and peanut butter in bite-sized form.
Print
S’mores Cookie Cups
- Total Time: 37 minutes
- Yield: 24 mini cookie cups 1x
Description
These S’mores Cookie Cups combine gooey marshmallows, melted chocolate, and buttery graham cracker cookie dough for a bite-sized twist on the classic campfire dessert. Perfect for parties, family nights, or whenever you crave something sweet and nostalgic.
Ingredients
Cookie Dough Base:
- 1 cup (100g) graham cracker crumbs
- 1 cup (120g) all-purpose flour
- ½ cup (100g) brown sugar, packed
- ½ cup (113g) unsalted butter, softened
- 1 egg, room temperature
- 1 teaspoon vanilla extract
- ½ teaspoon baking soda
- ¼ teaspoon salt
S’mores Filling:
- ½ cup mini marshmallows
- ½ cup semi-sweet chocolate chips (or small chocolate squares)
Optional Variations:
- 2 tablespoons peanut butter for a nutty twist
- 2 tablespoons caramel drizzle for extra sweetness
- Crushed graham crackers for topping
Instructions
Prepare the Dough:
- Preheat your oven to 350°F (175°C).
- Grease a mini muffin pan with non-stick spray or line with paper liners.
- In a bowl, cream butter and brown sugar until fluffy.
- Beat in the egg and vanilla extract.
- In a separate bowl, combine graham cracker crumbs, flour, baking soda, and salt.
- Gradually add dry ingredients to wet ingredients until a soft dough forms.
Shape the Cookie Cups:
- Scoop 1 tablespoon of dough into each mini muffin cavity.
- Press down gently to form a small well in the center.
Add Marshmallows and Bake:
- Place 2–3 mini marshmallows into the center of each cup.
- Bake for 10–12 minutes, until edges are golden and marshmallows puff slightly.
Add Chocolate:
- Remove from oven and immediately press chocolate chips or a chocolate square into each warm cup.
- Allow chocolate to melt naturally from the residual heat.
Cool and Serve:
- Let the S’mores Cookie Cups cool in the pan for 10 minutes to set.
- Carefully loosen with a butter knife and transfer to a cooling rack.
- Serve warm for gooey marshmallow centers or store once fully cooled.
Notes
Chill the dough for 20–30 minutes before baking for better shape retention.
For extra gooey centers, add a few extra marshmallows midway through baking.
Rotate the muffin pan halfway through baking for even browning.
- Prep Time: 15 minutes
- Additional Cooling Time: 10 minutes
- Cook Time: 12 minutes
- Category: Dessert
- Cuisine: American
Nutrition
- Serving Size: 24 Servings
- Calories: ~140 kcal
- Sugar: 12g
- Sodium: 85mg
- Fat: 6g
- Saturated Fat: 3.5g
- Carbohydrates: 20g
- Fiber: 1g
- Protein: 2g
What Makes S’mores Cookie Cups a Perfect Treat
S’mores Cookie Cups deliver a combination of textures and flavors that make them irresistible:
- Buttery graham cookie base – golden, soft, and slightly crisp on the edges.
- Melted marshmallow center – gooey and sweet, just like a campfire S’more.
- Rich chocolate topping – brings the classic S’mores flavor full circle.
They’re versatile for any occasion—make mini versions for lunchboxes, or larger cups for parties and holidays.
Love fruity desserts? Don’t miss our Strawberry Pizza for a colorful, sweet twist to your dessert table.
Ingredients and Tools You Need
Before you start baking your S’mores Cookie Cups, gathering the right ingredients and tools will make the process smoother and ensure your treats come out perfectly every time.
Key Ingredients for S’mores Cookie Cups
These simple ingredients combine to create the perfect balance of sweetness and texture:
| Ingredient | Purpose in Recipe | Substitution Option |
|---|---|---|
| Graham cracker crumbs | Base for cookie cup dough | Digestive biscuits or vanilla wafers |
| All-purpose flour | Structure for cookie dough | Gluten-free flour blend |
| Brown sugar | Adds sweetness and moisture | Coconut sugar for a deeper flavor |
| Unsalted butter | Richness and soft texture | Margarine or dairy-free butter |
| Mini marshmallows | Gooey S’mores center | Large marshmallows cut in halves |
| Semi-sweet chocolate chips | Melted chocolate filling | Milk or dark chocolate chips |
| Egg | Binds dough together | Flax egg for vegan version |
| Vanilla extract | Enhances flavor | Almond extract for a twist |
| Baking soda | Light and fluffy texture | None (baking powder not recommended) |
| Salt | Balances sweetness | Sea salt for extra flavor |
Pro Tip: Use mini marshmallows to prevent overflow when baking, and press them lightly into the dough to create that signature gooey center.
Need more marshmallow dessert ideas? Check out our Orange Creamsicle Dip Recipe for a fluffy, sweet treat that’s perfect for parties.
Essential Kitchen Tools and Baking Accessories
Having the right tools will make your baking experience stress-free and enjoyable:
- Mini muffin pan – Creates the perfect cup shape for each S’mores Cookie Cup.
- Mixing bowls – For preparing the dough and combining wet and dry ingredients.
- Electric mixer or whisk – Helps cream butter and sugar for a soft dough.
- Spatula – Essential for folding in chocolate chips and scraping bowls.
- Cookie scoop or spoon – Ensures even dough portions for uniform baking.
- Cooling rack – Keeps your cookie cups from becoming soggy after baking.
For another treat that benefits from mini muffin pans, try our Taco Ranch Bites in Phyllo Cups, which use the same pan for savory bites.
Step-by-Step Guide to Baking S’mores Cookie Cups
Baking S’mores Cookie Cups at home is a game-changer for dessert lovers. These mini cookie cups capture all the gooey, chocolatey, and marshmallow goodness of traditional S’mores but in a mess-free, oven-friendly format. By following these simple steps, you’ll master this fun dessert and impress your friends and family with bakery-quality treats.
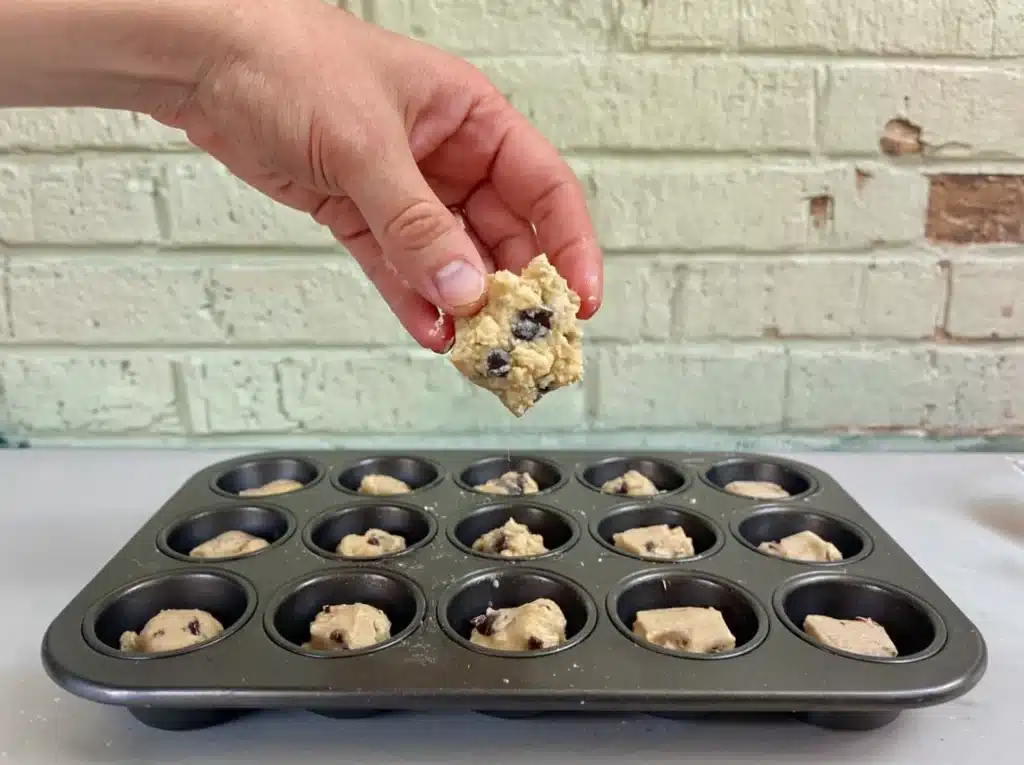
Step 1: Prepare the Cookie Dough Base for S’mores Cookie Cups
- Preheat your oven to 350°F (175°C) and grease a mini muffin pan. A non-stick pan is best for perfectly shaped S’mores Cookie Cups.
- In a large bowl, cream together softened butter and brown sugar until light and fluffy. This forms the base of your cookie cup dough.
- Mix in the egg and vanilla extract, which will give your S’mores Cookie Cups structure and flavor.
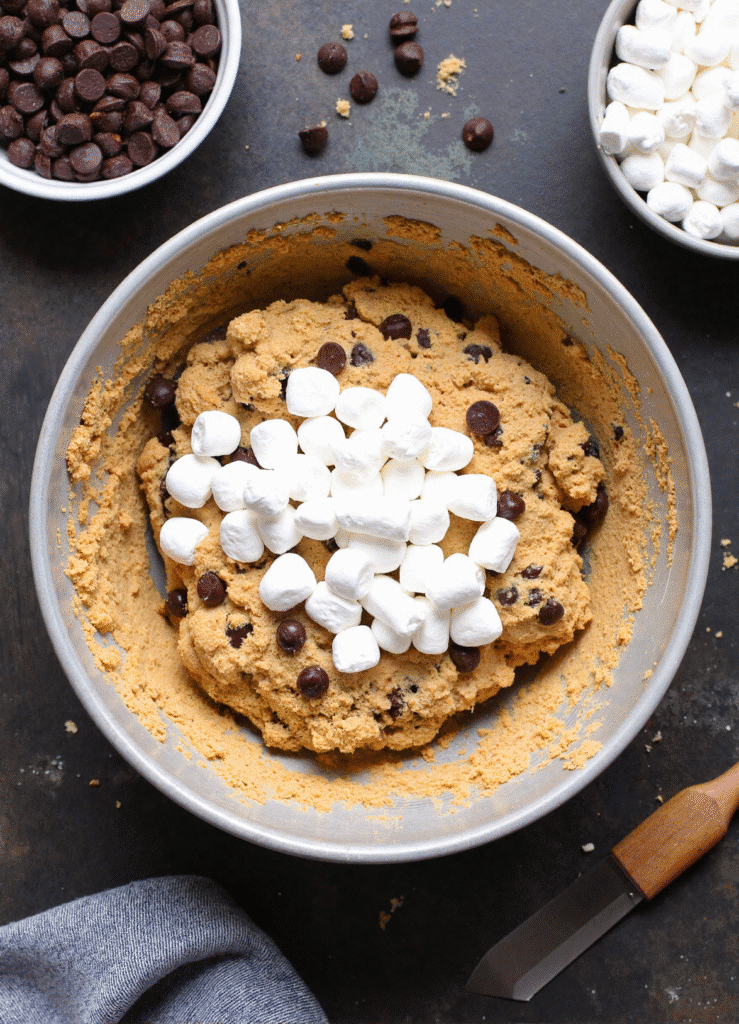
- In another bowl, combine graham cracker crumbs, all-purpose flour, baking soda, and salt. These dry ingredients are the foundation of that classic S’mores taste.
- Gradually fold the dry mixture into the wet mixture until a soft dough forms.
- Scoop 1-tablespoon portions of dough into your mini muffin pan cavities. Press down gently to form a small well in the center—this will hold the marshmallows and chocolate filling.
For another soft and chewy dough recipe, try our Buckeye Rice Krispie Treats, which deliver that same irresistible bite.
Step 2: Add Marshmallows and Chocolate to the Cookie Cups
- Place 2–3 mini marshmallows into the center of each cookie dough cup. This creates the signature gooey filling of S’mores Cookie Cups.
- Bake for 10–12 minutes, or until the edges are golden brown and the marshmallows start to puff up.
- Immediately press chocolate chips or a small chocolate square into the center of each warm cookie cup. The heat will naturally melt the chocolate, creating that authentic S’mores flavor.
Pro Tip: To elevate your S’mores Cookie Cups, sprinkle a pinch of crushed graham crackers or sea salt on top before serving.
Love desserts with melty chocolate? Check out our Slutty Brownie Ice Cream Sandwiches for another indulgent, chocolate-forward recipe.
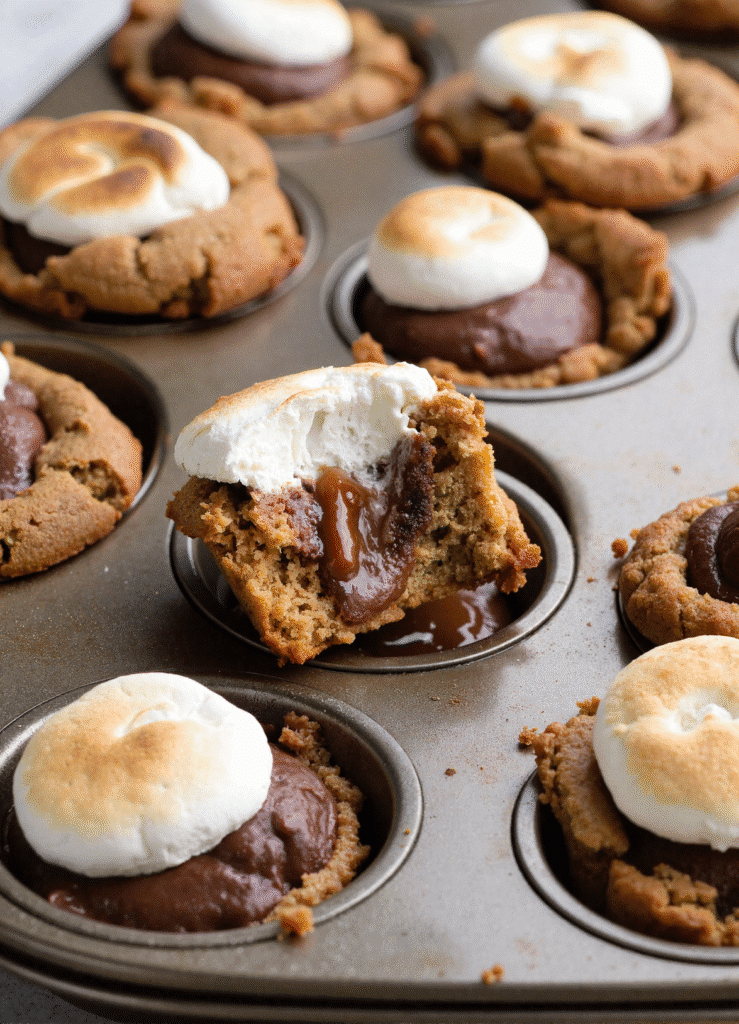
Step 3: Cool and Serve Your S’mores Cookie Cups
- Allow the cookie cups to cool in the pan for about 10 minutes to set.
- Gently loosen each cup with a butter knife and transfer to a cooling rack to avoid soggy bottoms.
- Serve your S’mores Cookie Cups warm for that classic, gooey, campfire-inspired bite, or store them in an airtight container for up to 3 days.
Looking for another show-stopping dessert for parties? Try our Strawberry Pizza, a fruity and colorful option to balance out your chocolate treats.
Why This Step-by-Step Method Works
By baking marshmallows inside the dough, your S’mores Cookie Cups develop a soft, chewy center without the mess of traditional S’mores. Pressing the chocolate in after baking prevents burning and ensures the perfect melt. This method guarantees that every bite of your S’mores Cookie Cups is rich, gooey, and irresistibly sweet.
Tips for Perfectly Gooey and Crispy S’mores Cookie Cups
One of the secrets to making S’mores Cookie Cups irresistible is balancing the textures—soft, gooey centers with slightly crisp edges. Even if you follow the basic recipe, a few expert tips can take your cookie cups from good to unforgettable.
How to Keep Marshmallows Gooey and Golden
- Use Mini Marshmallows: Larger marshmallows can expand too much and overflow. Mini ones melt evenly and give that classic gooey S’mores texture.
- Add Marshmallows Mid-Bake: If your marshmallows brown too quickly, bake the cookie cups for 6 minutes first, then add the marshmallows and finish baking.
- Avoid Overbaking: Overbaking leads to chewy or tough cookie cups. Remove from the oven as soon as the edges turn golden and the marshmallows puff.
If you love gooey marshmallow desserts, check out our Orange Creamsicle Dip Recipe for another soft, melt-in-your-mouth treat.
Achieving the Perfect Crisp Edge Without Burning
- Chill the Dough Before Baking: Refrigerate the dough for 20–30 minutes to prevent the cookie cups from spreading too much.
- Use Nonstick Mini Muffin Pans: This helps create golden edges without overbaking.
- Let Them Cool in the Pan: Allowing S’mores Cookie Cups to rest in the hot pan for 5–10 minutes ensures the bottoms crisp while the centers stay gooey.
Pro Tip: Dust a pinch of graham cracker crumbs on the pan before adding dough for extra crunch.
Love desserts with a little crunch? Try our Strawberry Pretzel Salad Recipe, which balances creamy sweetness with a crispy crust.
Extra Tricks for Professional-Looking S’mores Cookie Cups
- Press Chocolate After Baking: Adding the chocolate chips or chocolate square right after baking keeps it glossy and soft.
- Rotate the Pan Halfway: Ensures even browning for all cookie cups.
- Experiment With Toppings: Sprinkle crushed graham crackers, mini chocolate chips, or even a drizzle of caramel to elevate presentation.
Want another crowd-pleasing presentation idea? Our Funfetti Dip Recipe is a colorful party favorite that pairs perfectly with cookie cups.
Why These Tips Work for S’mores Cookie Cups
Perfect S’mores Cookie Cups rely on heat control and timing. By chilling the dough, monitoring marshmallow browning, and allowing them to rest in the pan, you achieve that ideal contrast: crisp edges, gooey marshmallow centers, and soft chocolate.
Every bite delivers the nostalgia of classic S’mores with the convenience of a handheld cookie cup.
Creative Variations and Flavor Twists for S’mores Cookie Cups
One of the best things about S’mores Cookie Cups is how versatile they are. Once you’ve mastered the classic recipe, you can get creative with flavors and fillings to surprise your guests—or just keep things exciting for yourself. These twists are perfect for parties, holidays, or whenever you want to elevate your homemade cookie cups.
Adding Irresistible Flavor Variations
- Peanut Butter S’mores Cookie Cups
- Add 1 teaspoon of peanut butter in the center before topping with marshmallows.
- Peanut butter adds a salty, nutty twist that pairs perfectly with chocolate.
- For more nutty inspiration, check out our Buckeye Rice Krispie Treats, another chocolate-peanut butter favorite.
- Caramel or Salted Caramel S’mores Cookie Cups
- Drizzle caramel sauce over the chocolate center after baking.
- Sprinkle sea salt for a sweet-and-salty flavor boost.
- Nutella S’mores Cookie Cups
- Replace chocolate chips with a dollop of Nutella for a creamy, hazelnut-rich center.
- This variation creates an ultra-decadent cookie cup with a smooth texture.
- Fruity S’mores Cookie Cups
- Add small fruit pieces like strawberries or bananas to the filling.
- This is perfect for summer gatherings or adding a pop of freshness.
- Try our Strawberry Pizza for more fruity dessert inspiration.
Holiday and Seasonal Twists for S’mores Cookie Cups
- Christmas Edition: Add crushed peppermint candies or drizzle with white chocolate for a festive look.
- Halloween Treats: Use orange and black candy melts instead of chocolate chips.
- Fourth of July Party Cups: Top with red, white, and blue sprinkles for a patriotic twist.
- Fall Pumpkin Spice Cups: Add ½ teaspoon of pumpkin spice to the cookie dough for a warm, seasonal flavor.
For another holiday-ready treat, try our Orange Creamsicle Salad, which is always a hit at gatherings.
Make It a Gourmet Dessert Experience
If you want to turn your S’mores Cookie Cups into a gourmet-style dessert, consider:
- Drizzling with Chocolate Ganache: Use heavy cream and chocolate for a glossy topping.
- Adding a Graham Cracker Crumble: Sprinkle extra crumbs on top for more crunch.
- Serving with Ice Cream: Warm cookie cups with a scoop of vanilla ice cream mimic a molten lava cake experience.
Looking for another indulgent dessert pairing? Don’t miss our Slutty Brownie Ice Cream Sandwiches for a rich, layered chocolate treat.
Why Variations Keep S’mores Cookie Cups Exciting
Experimenting with fillings and toppings ensures your S’mores Cookie Cups never get boring. These variations can fit any holiday, flavor preference, or special event, making them a dessert that’s endlessly adaptable. Whether it’s a peanut butter twist or a fruity summer version, every batch delivers a unique experience.
Storing and Reheating Your S’mores Cookie Cups
After you’ve baked a perfect batch of S’mores Cookie Cups, knowing how to store and reheat them properly ensures they remain gooey and delicious for days. These treats can last several days without losing flavor if handled the right way.
Best Practices for Storing S’mores Cookie Cups
- Room Temperature Storage:
- Keep your S’mores Cookie Cups in an airtight container at room temperature for up to 3 days.
- Store in a single layer or separate layers with parchment paper to prevent sticking.
- Refrigeration for Longer Freshness:
- Refrigerate your cookie cups for up to 5 days if you live in a warm climate.
- Let them come to room temperature before serving for the best texture.
- Freezing for Future Enjoyment:
- Freeze completely cooled S’mores Cookie Cups in a freezer-safe container for up to 2 months.
- Separate layers with wax paper to maintain their shape and prevent sticking.
How to Reheat S’mores Cookie Cups Without Losing Texture
- Oven Method (Best for Crisp Edges):
- Preheat oven to 300°F (150°C).
- Warm cookie cups for 5–7 minutes to revive the gooey marshmallow center and crispy edges.
- Microwave Method (Quick and Easy):
- Heat each S’mores Cookie Cup for 10–15 seconds.
- Avoid over-microwaving to prevent the marshmallow from turning rubbery.
- Air Fryer Method (Optional):
- Reheat at 320°F (160°C) for 2–3 minutes for a crisp finish and warm center.
Tips for Maintaining Freshness
- Always let cookie cups cool completely before storing to prevent condensation.
- Keep them away from strong odors in the fridge or freezer to preserve their sweet flavor.
- If freezing, wrap individually in plastic wrap for easy grab-and-go treats.
Why Proper Storage Matters for S’mores Cookie Cups
Storing and reheating properly preserves the signature textures of S’mores Cookie Cups—gooey centers, soft cookie bases, and slightly crisp edges. With these methods, you can enjoy homemade S’mores goodness days or even weeks later without compromising flavor.
Serving Ideas and Pairings for S’mores Cookie Cups
Enjoying S’mores Cookie Cups is more than just a dessert—it’s an experience. How you serve and pair them can transform these bite-sized treats into the star of any gathering. Whether it’s a casual family night or a festive celebration, the right presentation and pairings can make your cookie cups unforgettable.
Best Beverages to Serve with S’mores Cookie Cups
- Classic Hot Chocolate
- Nothing complements S’mores Cookie Cups like rich, creamy hot chocolate.
- For a twist, top the hot chocolate with whipped cream and a drizzle of chocolate syrup.
- Coffee or Espresso
- The slight bitterness of coffee balances the sweetness of the cookie cups.
- Try a latte or cappuccino for a cozy café-style pairing.
- Milk (Classic Choice)
- Cold milk is the simplest, most nostalgic pairing for S’mores Cookie Cups.
- Consider flavored milk like vanilla or almond for an extra treat.
- Iced Coffee or Cold Brew
- Perfect for summer gatherings, chilled coffee enhances the cookie cups without overwhelming the flavor.
- Holiday Drinks
- Serve alongside eggnog, peppermint lattes, or even a non-alcoholic holiday punch for seasonal flair.
Presentation Ideas for Parties and Gatherings
- Mini Dessert Platters:
Arrange your S’mores Cookie Cups on a tiered dessert tray with other bite-sized treats for a stunning visual effect. - S’mores Dessert Bar:
Let guests customize their cookie cups by adding toppings like crushed graham crackers, caramel drizzle, or chocolate sprinkles. - The Ice Cream Upgrade:
Serve warm S’mores Cookie Cups with a scoop of vanilla or chocolate ice cream to create a molten lava cake effect. - Seasonal Decorations:
Add a light dusting of powdered sugar in winter or colorful sprinkles for birthdays to make them festive.
Creative Plating Ideas for Instagram-Worthy Treats
- Stack S’mores Cookie Cups in a small pyramid and drizzle with melted chocolate.
- Place a single cookie cup in a decorative cupcake liner for an elegant individual serving.
- Garnish with a mini chocolate bar or toasted marshmallow on top for a gourmet finish.
Why Presentation and Pairings Enhance S’mores Cookie Cups
Desserts that look as good as they taste create a memorable experience. By pairing S’mores Cookie Cups with the right beverages and plating them creatively, you can turn a simple homemade treat into a professional-quality dessert that impresses guests and elevates any occasion.
Troubleshooting Common Baking Issues with S’mores Cookie Cups
Even experienced bakers sometimes run into challenges when making S’mores Cookie Cups. Marshmallows can burn, cups can collapse, or the dough may stick to the pan. The good news is that these issues are easy to fix with the right techniques. Here’s how to troubleshoot the most common problems.
Why Your S’mores Cookie Cups Collapse
- Underbaking the Cookie Dough
- If the cookie cups are removed from the oven too soon, the centers may sink.
- Solution: Bake until the edges are golden brown and the marshmallows are slightly puffed.
- Not Chilling the Dough
- Warm dough spreads too quickly and loses its structure.
- Solution: Chill the dough for at least 20 minutes before baking to hold the cup shape.
Fixing Sticky or Stuck Cookie Cups
- Nonstick Pan or Liners Are Key
- Sticky S’mores Cookie Cups often result from using a dry, ungreased pan.
- Solution: Lightly grease your mini muffin pan or use paper liners for effortless removal.
- Cool Before Removing
- Trying to remove the cups too early can cause breakage.
- Solution: Allow cookie cups to cool for 10 minutes in the pan to set before loosening with a butter knife.
Preventing Burnt Marshmallows
- Lower the Oven Temperature
- High heat can quickly burn marshmallows before the dough is fully cooked.
- Solution: Bake at 325–350°F (160–175°C) and monitor closely during the last few minutes.
- Add Marshmallows Midway
- If burning is a recurring issue, bake the cookie cups for half the time, then add marshmallows to finish baking.
Solving Dry or Overbaked Cookie Cups
- Measure Flour Correctly
- Too much flour leads to dense, dry S’mores Cookie Cups. Spoon and level the flour rather than scooping directly.
- Use Brown Sugar for Moisture
- Brown sugar adds softness and helps retain moisture in cookie dough.
- Do Not Overbake
- Remove the cups as soon as the edges are golden; residual heat will finish the cooking process.
Why Troubleshooting Improves Every Batch
Learning to identify and fix these baking problems ensures your S’mores Cookie Cups are perfect every time. With proper timing, dough preparation, and temperature control, you’ll enjoy gooey marshmallows, rich chocolate centers, and golden, soft cookie bases in every batch.
Conclusion
Homemade S’mores Cookie Cups are the perfect fusion of nostalgia and convenience. They capture the gooey marshmallow, rich chocolate, and buttery graham cracker flavor of a classic campfire S’more—without the sticky mess. From mastering the dough to perfecting storage and exploring endless variations, these cookie cups are versatile enough for casual family nights or festive gatherings.
With the step-by-step methods, troubleshooting tips, and flavor twists shared in this guide, you can confidently bake S’mores Cookie Cups that rival any bakery treat. Whether you’re recreating the magic of discontinued seasonal cookies or just satisfying a late-night chocolate craving, this recipe is your ticket to irresistible, bite-sized indulgence.
FAQs About S’mores Cookie Cups
Why are S Mores cookies discontinued?
S’mores cookies, particularly seasonal ones like the Girl Scouts’ S’mores flavor, are often discontinued due to limited seasonal runs and production costs. Companies rotate flavors to maintain excitement and manage inventory. Homemade S’mores Cookie Cups are the perfect solution to enjoy that flavor year-round without relying on seasonal availability.
Do marshmallows melt if baked in a cookie?
Yes, marshmallows do melt when baked, but how they melt depends on the temperature and baking time. In S’mores Cookie Cups, mini marshmallows puff and become gooey inside the dough, creating that classic campfire texture. To prevent burning, avoid prolonged exposure to high heat and consider adding marshmallows halfway through baking.
What to fill in cookie cups?
Cookie cups can be filled with almost anything sweet, but for S’mores Cookie Cups, the classic combination is:
Mini marshmallows
Semi-sweet or milk chocolate
Optional: Peanut butter, caramel, Nutella, or fruit for variations
This flexibility makes cookie cups versatile for any flavor profile.
Are Girl Scouts getting rid of S Mores cookies?
Yes, Girl Scouts occasionally remove the S’mores cookie flavor from their lineup to rotate seasonal offerings. Availability can vary by year and location. Making your own S’mores Cookie Cups at home ensures you’ll never miss out on that classic combination of marshmallows, chocolate, and graham crackers.
Why are Girl Scout Cookies so expensive?
Girl Scout Cookies are priced higher because proceeds fund local troop activities, community service projects, and leadership programs. Unlike mass-market cookies, the price supports a mission, which is why seasonal cookies like S’mores are a special treat.
Are Girl Scout Cookies safe to eat?
Yes, Girl Scout Cookies are generally safe to eat. They’re produced by licensed bakeries that follow food safety guidelines. As with all packaged cookies, check expiration dates and allergen warnings. For a fresh and customizable alternative, homemade S’mores Cookie Cups allow you to control ingredients and avoid preservatives.