Grandma’s Apple Crumb Bars – The Nostalgic Dessert That Feels Like Home
There’s something irresistibly comforting about Grandma’s Apple Crumb Bars—the kind of dessert that instantly brings back memories of warm kitchens, laughter, and the scent of cinnamon-spiced apples drifting through the air. These bars have long been a staple in my family, often served alongside other autumn favorites like these Maple Dijon Roasted Carrots and Apples that always graced our holiday table. But it’s the crumb bars that hold the dearest place in my heart, and here’s why.
Baking in Grandma’s Kitchen: A Memory of Warmth
As a little girl, I spent countless afternoons in my grandmother’s cozy kitchen, standing on a wooden stool dusted with flour. Her apron always smelled like vanilla and cloves. While the world outside turned brisk and golden with fall, we stayed tucked inside, peeling apples and preparing her signature Grandma’s Apple Crumb Bars. The recipe was never written down—just passed from hand to hand with a pinch of this and a handful of that.
She’d hum softly as she sliced tart apples—usually Granny Smiths—mixing them with brown sugar, cinnamon, and a squeeze of lemon. I remember how she’d let me press the crumbly base into the pan with my little fingers, always warning me not to overwork it so the crust stayed light and tender.
When the bars baked, the smell was hypnotic: warm spices, bubbling fruit, and that buttery golden topping that crisped just right. We’d let them cool by the window, barely resisting the urge to sneak a bite before they set. I don’t think I ever waited long enough.
To this day, no dessert captures that blend of home and happiness quite like these bars. They weren’t just a treat—they were tradition. Whether we were prepping for Sunday dinner or wrapping them in parchment for church bake sales, Grandma’s Apple Crumb Bars were the recipe we returned to time and again.
Table of Contents
Table of Contents
Why These Bars Are Still Loved Today
There’s a reason why Grandma’s Apple Crumb Bars never go out of style. They strike that perfect balance between soft and crisp, tart and sweet. The apple filling is tender and slightly tangy, which plays beautifully against the buttery crumble topping. It’s a dessert that doesn’t need any frills to impress—though a scoop of vanilla ice cream on the side never hurts.
The genius of these bars is in their simplicity. No pie crust to roll, no lattice to braid. Just a press-in dough, a layer of apples, and a crumble topping that turns golden in the oven. Even beginners can pull off a batch with confidence.
And yet, they’re versatile too. You can play with the spices, add chopped nuts for crunch, or drizzle a bit of caramel over the top for extra indulgence. I’ve even made a fall-themed tray with crushed pretzels on top, inspired by this Candy Corn Pretzel Hugs idea—it gave the bars a salty-sweet kick that surprised everyone.
Beyond the flavors, these bars are meant to be shared. They travel well, cut cleanly, and keep for days (if they last that long). They’re perfect for bake sales, potlucks, cozy holiday gatherings, or those quiet moments when you just need a bite of something that tastes like home.
Ingredients & Tools Breakdown for Grandma’s Apple Crumb Bars
Essential Ingredients for Apple Crumb Bars That Taste Just Like Grandma’s
When it comes to recreating Grandma’s Apple Crumb Bars, the secret lies in quality ingredients and the balance between tart apples and a buttery, sweet crumble. The beauty of this recipe is that it’s easy to master but never boring. Even if you’ve made these a dozen times, they still surprise you with every bite.
Let’s start with the basics. For truly authentic Grandma’s Apple Crumb Bars, go for crisp apples with a natural tartness. Granny Smith is a classic choice because it holds up during baking and gives that nostalgic zing grandma always loved. If you prefer a sweeter twist, try Honeycrisp or Braeburn.
The crust and topping are made from the same buttery oat mixture—another hallmark of this family recipe. It’s crumbly, golden, and toasty, with just the right amount of chew. A good rule of thumb? Use cold butter cut into the flour and oats to keep things flaky and light.
Here’s a helpful overview of the core ingredients:
| Ingredient | Purpose |
|---|---|
| Fresh Apples (5–6 medium) | Tart flavor and texture |
| All-Purpose Flour | Forms the base and topping |
| Old-Fashioned Oats | Adds chew and crunch |
| Brown Sugar | Deep molasses flavor |
| Ground Cinnamon & Nutmeg | Classic warming spice |
| Cold Unsalted Butter | Creates flaky crumb texture |
| Lemon Juice | Keeps apples fresh and bright |
For those following a dairy-free or gluten-free lifestyle, swaps are easy. Coconut oil or vegan butter can replace traditional butter, and oat flour works well in place of all-purpose flour.
Looking for a unique spin? Add a spoonful of maple syrup to the apple filling for a flavor that pairs beautifully with fall, like in this Quick and Easy Gingerbread Cake. A touch of warmth and spice can transform your version of Grandma’s Apple Crumb Bars into something fresh and new, while still feeling true to the original.

Kitchen Tools and Prep Tips from Grandma’s Era
You don’t need any fancy gadgets to make Grandma’s Apple Crumb Bars—just a few trusted tools, many of which have stood the test of time. In fact, you probably already have everything you need in your kitchen.
Here’s what I always use when baking these:
- 9×13-inch Baking Dish – The ideal size for evenly baked bars
- Pastry Cutter or Fork – For cutting butter into the flour and oats
- Mixing Bowls – One for dry, one for apples
- Peeler & Sharp Knife – To prep apples quickly and cleanly
- Parchment Paper – For easy removal and zero sticking
Grandma swore by prepping everything before starting—what she called her “mise en place.” And she was right. Having your ingredients measured and ready makes the process smooth and enjoyable.
One more tip: if your butter softens too quickly, pop the bowl in the freezer for 5 minutes before crumbling. Cold butter equals crisp topping.
If you’re baking these for Halloween or a themed event, consider creating a spooky spin like the color-played layers in this Halloween Oreo Bark. Even the classics can get a fun twist with just a little creativity.
What matters most isn’t how perfect your bars look—but that they’re made with the same care and heart Grandma always put in hers. And trust me, once the aroma starts wafting from your oven, you’ll know you’ve nailed that Grandma’s Apple Crumb Bars magic.
Print
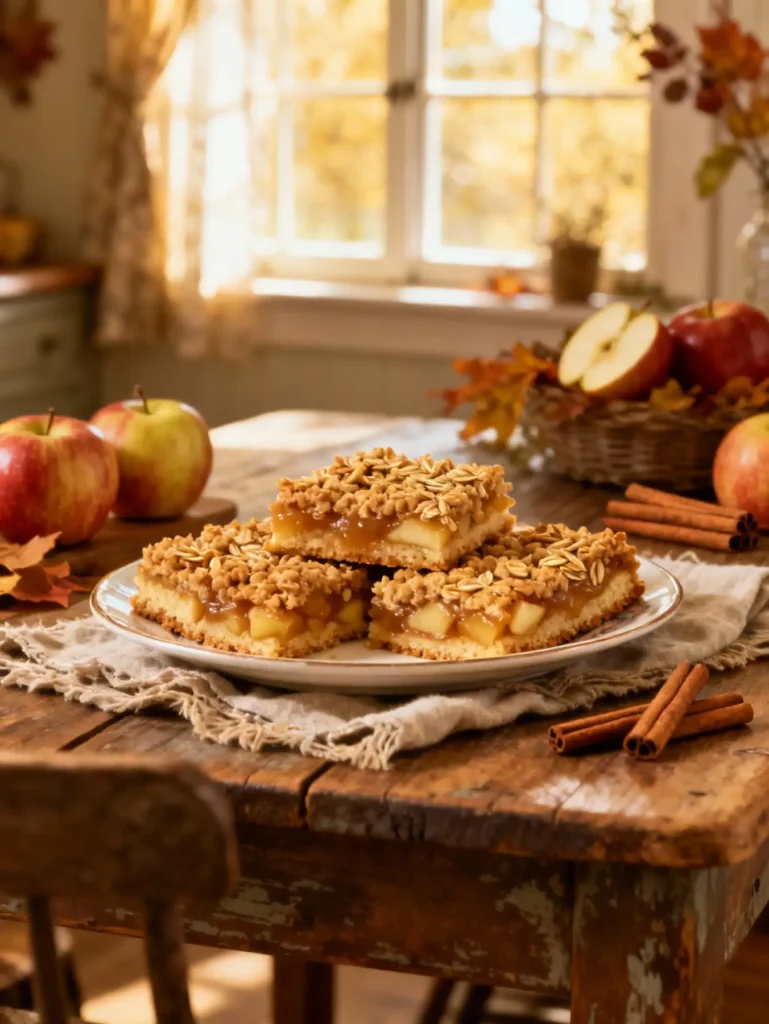
Grandma’s Apple Crumb Bars
- Total Time: 1 hour 5 minutes
- Yield: 16 bars 1x
Description
These classic Grandma’s Apple Crumb Bars are filled with tender apples and warm spices, layered between a buttery crumb crust and topping. A nostalgic treat that’s easy to bake and perfect for any season.
Ingredients
- 5–6 medium Granny Smith apples, peeled and thinly sliced
- 2 cups all-purpose flour
- 1 cup old-fashioned oats
- 1 cup brown sugar
- 1 tsp ground cinnamon
- ½ tsp ground nutmeg
- 1 tsp baking powder
- ½ tsp salt
- 1 tbsp lemon juice
- 1 tbsp all-purpose flour (for apple filling)
- 1 cup cold unsalted butter, cut into cubes
Instructions
- Preheat oven to 350°F (175°C). Line a 9×13 baking dish with parchment paper.
- In a bowl, toss sliced apples with brown sugar, cinnamon, nutmeg, lemon juice, and 1 tbsp flour. Set aside.
- In another bowl, whisk together 2 cups flour, oats, brown sugar, baking powder, and salt.
- Cut in the cold butter until the mixture resembles coarse crumbs.
- Press half of the crumb mixture into the prepared pan to form the crust.
- Spread apple mixture evenly over the crust.
- Sprinkle the remaining crumb mixture on top of the apples.
- Bake for 40–45 minutes until golden and bubbling at the edges.
- Let cool completely before cutting into bars.
- Serve warm or chilled. Enjoy!
Notes
You can substitute half the apples with pears or add cranberries for a seasonal twist.
For a nutty crunch, add chopped pecans to the topping.
Letting the bars cool fully helps them slice cleanly.
- Prep Time: 20 minutes
- Cook Time: 45 minutes
- Category: Dessert
- Method: Baking
- Cuisine: American
Nutrition
- Serving Size: 1 bar
- Calories: 265 kcal
- Sugar: 18g
- Sodium: 120mg
- Fat: 12g
- Saturated Fat: 7g
- Unsaturated Fat: 4g
- Trans Fat: 0g
- Carbohydrates: 37g
- Fiber: 2g
- Protein: 3g
- Cholesterol: 30mg
Step-by-Step Baking Process for Grandma’s Apple Crumb Bars
Making the Perfect Crumb Base and Filling
Baking Grandma’s Apple Crumb Bars is a comforting ritual that starts with two essential layers: the buttery base and the warmly spiced apple filling. The genius of this recipe is that the crumb topping and the crust come from the same dough—half is pressed into the pan, and the other half gets scattered on top for a golden finish.
Step 1: Prepare the Apple Filling
Start by peeling and thinly slicing 5–6 medium apples. If you’re unsure which variety to use, stick with Granny Smith for that tartness grandma loved, or go for a mix if you like depth. Toss the apples with:
- ¼ cup brown sugar
- 1 teaspoon cinnamon
- ½ teaspoon nutmeg
- 1 tablespoon lemon juice
- 1 tablespoon all-purpose flour (to thicken juices)
Let the mixture sit while you prep the crust. This helps the apples release just enough juice without going soggy during baking.
Step 2: Make the Crumb Dough
In a large bowl, whisk together:
- 2 cups all-purpose flour
- 1 cup old-fashioned oats
- 1 cup brown sugar
- 1 teaspoon baking powder
- ½ teaspoon salt
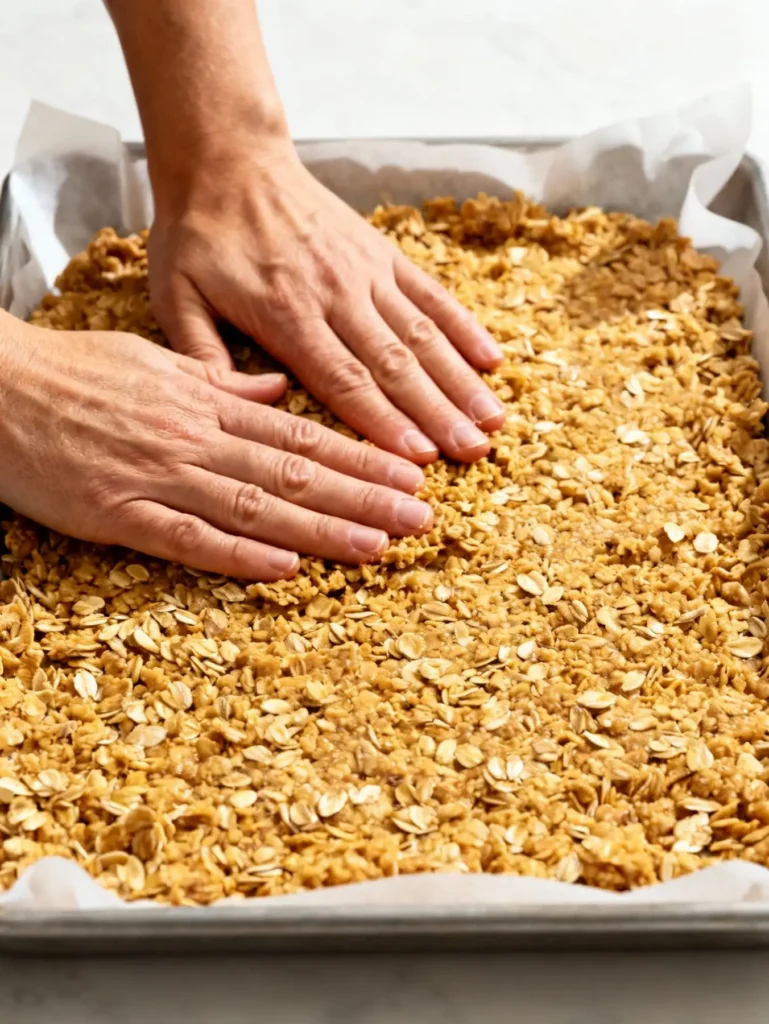
Cut in 1 cup (2 sticks) cold, unsalted butter using a pastry cutter or fork. Mix until the mixture resembles coarse crumbs—just like grandma used to do with her hands and a big smile.
Step 3: Press the Base
Preheat your oven to 350°F (175°C). Line a 9×13-inch baking dish with parchment paper, leaving an overhang for easy lifting. Press half of the crumb mixture firmly into the bottom of the dish. This will form the base of your Grandma’s Apple Crumb Bars.
Pro tip: use the bottom of a glass or measuring cup to press the crust evenly. Don’t overwork it—just enough to make a compact layer.
Step 4: Add the Apples
Spread your apple mixture evenly over the crust. You’ll start to smell that nostalgic blend of cinnamon and tart apple. This filling is juicy but not wet—perfect for baking up without making the bars soggy.
Step 5: Top It Off
Sprinkle the remaining crumb mixture over the apples. It should look rustic and inviting, just like grandma’s.
Baking, Cooling, and Cutting Like a Pro
Once your bars are assembled, it’s time to let the oven do the magic. The smell alone will transport you back to childhood—those days when grandma let you peek through the oven door.
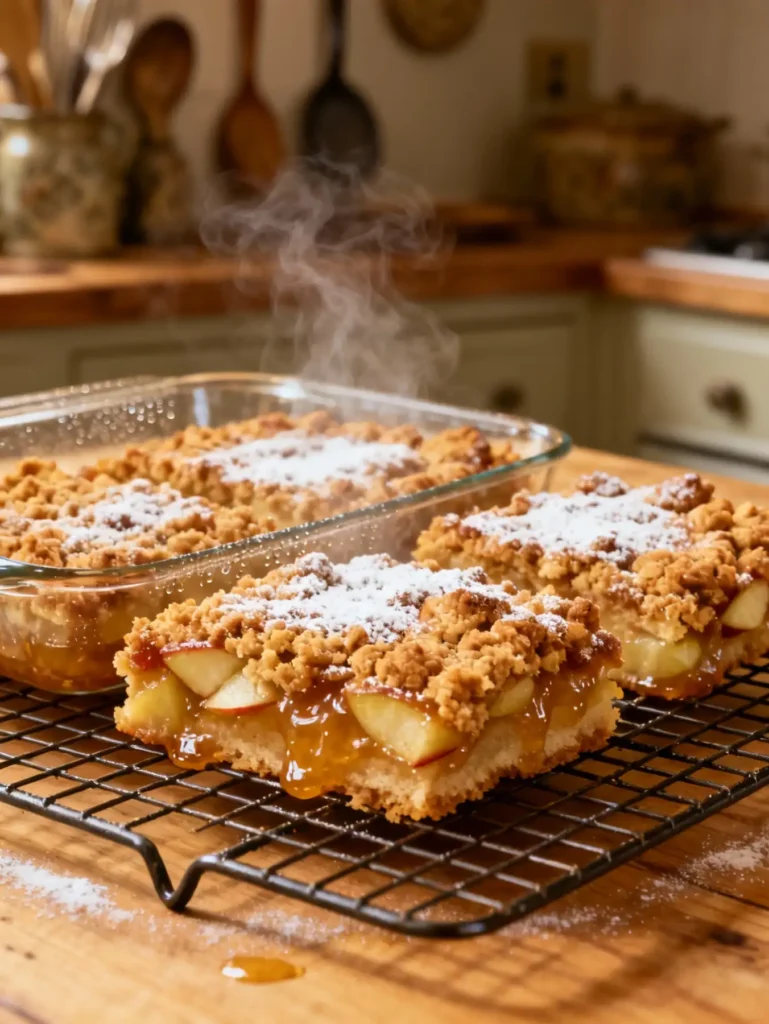
Step 6: Bake to Golden Perfection
Place the dish in the preheated oven and bake for 40–45 minutes, or until the top is golden brown and the apples are bubbling just slightly at the edges. The crumble should feel crisp to the touch but not too hard.
Every oven is a little different, so check around the 40-minute mark. If the top isn’t browning, give it an extra 5 minutes.
Step 7: Let Them Cool (Hardest Part!)
Let the bars cool in the pan for at least 1 hour—preferably longer. You want them firm enough to slice cleanly. Rushing this step may cause the base to crumble or the filling to ooze.
For best results, chill them in the fridge before cutting. Grandma used to pop them on the windowsill, and while we don’t all have one handy, the fridge does the trick.
Step 8: Slice and Serve
Use a sharp knife to cut into squares or rectangles. The parchment overhang will let you lift the whole slab out easily. You can store leftovers (if there are any) in an airtight container at room temperature for 2 days—or in the fridge for up to 5.
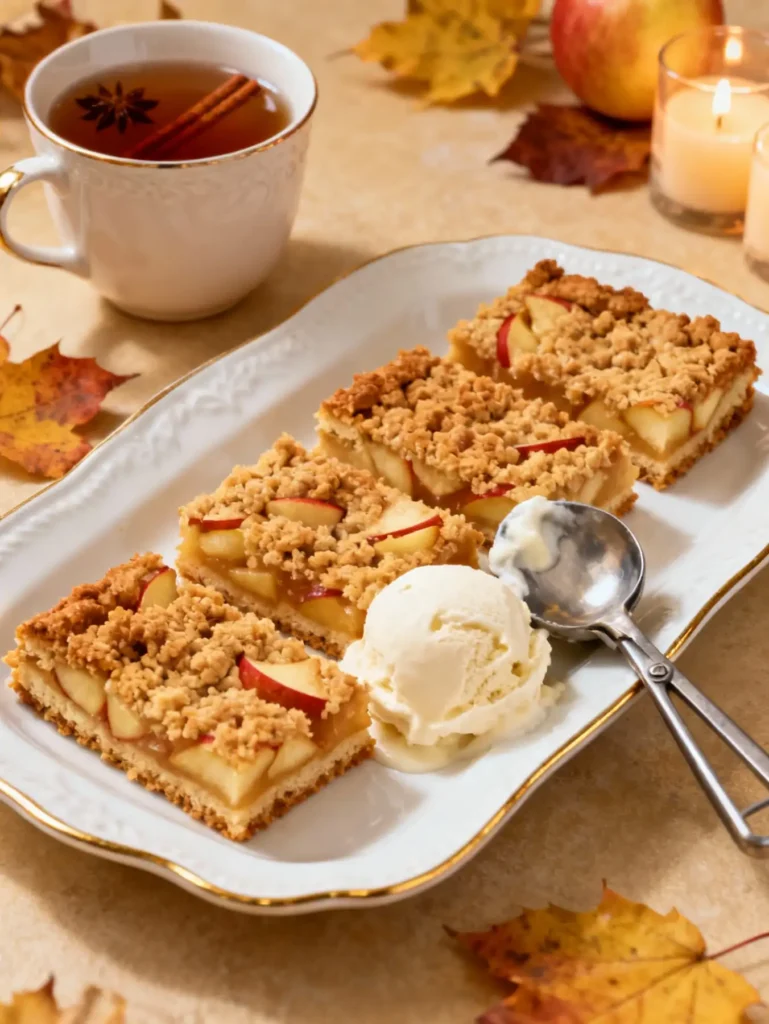
Want to serve them with flair? Add a scoop of vanilla ice cream or a drizzle of caramel sauce—just like I did after making these Crispy Cotton Candy Cheesecake Bombs. A little extra sweetness never hurts.
Planning to take them to a Halloween party? Serve them next to fun treats like these Halloween Whoopie Pies for a nostalgic-meets-festive dessert table.
Why This Process Works Every Time
There’s no need for perfection when making Grandma’s Apple Crumb Bars. That’s part of their charm. The steps are forgiving, the ingredients are simple, and even the messiest bake still tastes incredible.
Over the years, I’ve made this recipe in tiny apartment ovens, rustic cabin kitchens, and modern ranges—and the results are always the same: warm, crumbly, and full of love. It’s the kind of recipe you memorize not because you have to, but because you want to.
Whether you’re making these bars for a holiday, a bake sale, or a Tuesday afternoon, they’ll always bring that familiar warmth that only grandma’s baking can give.
Creative Twists on Grandma’s Apple Crumb Bars for Every Season
Spice It Up: Fun Variations of Grandma’s Bars
One of the best things about Grandma’s Apple Crumb Bars is how effortlessly they adapt to different flavor profiles. The base is strong, the filling is flexible, and the topping? Pure gold. But don’t stop at the original—here are some incredible ways to reimagine grandma’s favorite treat without losing the soul of the recipe.
1. Apple-Cranberry Crumb Bars
Adding tart cranberries to the apple filling introduces a seasonal burst of flavor. It’s especially perfect for Thanksgiving or Christmas when cranberries are everywhere. Just fold in a cup of fresh or dried cranberries with the apples, and reduce the sugar slightly.
2. Caramel Apple Bars
If you’re a fan of rich, gooey desserts, drizzle some homemade or store-bought caramel over the apple layer before topping with crumbs. When baked, it melts into the apples and gives the bars a decadent twist. You can even swirl a little caramel into the base dough.
3. Maple-Pecan Crunch
For a nutty take, mix ½ cup chopped pecans into the crumb topping. Add a splash of maple syrup to the filling and enjoy that classic fall flavor—similar to the cozy vibes found in this Apple Cider Halloween Punch. It adds sweetness without overpowering the fruit.
4. Pear & Apple Duo
Mix sliced pears and apples in equal parts for a mellow, juicy blend. Pears soften more than apples, so this creates a softer filling that melts in your mouth.
No matter the variation, the heart of Grandma’s Apple Crumb Bars remains the same: honest, simple ingredients brought together with love.
Want to make them extra special? Add a pinch of cardamom or ground ginger to the crumb for a subtle warmth that catches everyone off guard in the best way.
Make It Seasonal: Fall, Halloween, or Christmas Bars
These bars may have originated as a humble kitchen classic, but they’re incredibly adaptable for every season. With a few small tweaks, you can turn Grandma’s Apple Crumb Bars into festive showstoppers.
For Fall: Warm & Rustic
Use cinnamon, nutmeg, and a pinch of clove for that deep autumn spice. Incorporate chopped walnuts or almonds into the crumb. Serve warm with whipped cream and a sprinkle of cinnamon sugar for a treat that feels like a cozy sweater in dessert form.
For Halloween: Spooky Sweet Fun
Give your bars a playful touch with colored icing drizzles, candy eyes, or black sugar sprinkles. You can even layer with a chocolate swirl for a dramatic look. Serve alongside fun desserts like this Halloween Oreo Bark for a kid-friendly dessert table. The bars become a soft, sweet contrast to all the crunchy Halloween candy.
For Christmas: Spiced and Elegant
Add dried cranberries and a handful of chopped pistachios to the topping for color and crunch. Dust with powdered sugar before serving, or cut into star shapes using a cookie cutter for a charming holiday platter.
Want a glaze? Mix powdered sugar with a splash of milk and vanilla, then drizzle once the bars are cool. It adds a soft sweetness without overpowering the apple filling.
These versions are festive, flavorful, and still grounded in the nostalgic flavor profile of Grandma’s Apple Crumb Bars. They’re the perfect reminder that you don’t have to reinvent the wheel—you just need to add a little seasonal charm.
And honestly, no matter what twist you choose, the essence of the original always shines through. It’s why these bars never go out of style.
Whether you serve them at a fall bake sale, wrap them in ribbon for Christmas gifts, or line them up on your Halloween party table, Grandma’s Apple Crumb Bars will always feel right. They’re the kind of dessert that adapts, transforms, and still carries that familiar warmth with every bite.
Serving Grandma’s Apple Crumb Bars & Sharing the Tradition
How to Serve Apple Crumb Bars for Any Occasion
Once your Grandma’s Apple Crumb Bars are baked, cooled, and cut, it’s time to enjoy them the way grandma always intended—with people you love and coffee on the table. These bars are made to be shared, passed around on platters, wrapped in parchment, or stashed in lunchboxes as a sweet surprise.
Best way to serve them?
Slightly warm with a dollop of whipped cream or a scoop of vanilla bean ice cream. The buttery crust softens, the apples melt, and the crumb topping stays crisp—absolute dessert harmony. If you’re serving guests, try arranging the bars on a white platter with a dusting of powdered sugar for an elegant, rustic touch.
Want to turn dessert into a full autumn-inspired menu? These bars pair beautifully with cozy dishes like the Cherry Slab Pie Recipe for large gatherings or the Strawberry Pretzel Salad Recipe as a sweet-tart contrast.
Best pairings include:
- Chai lattes or apple cider in fall
- Hot chocolate with peppermint during winter
- Iced coffee or herbal tea in warmer months
These bars adapt to the vibe of the season just as easily as they adapt to the flavors.
Grandma’s Traditions & What These Bars Mean to Me
Every time I make Grandma’s Apple Crumb Bars, I feel like she’s standing right beside me. The worn-down recipe card in my kitchen drawer is stained with cinnamon and love. I can still picture her hands moving confidently through each step—measuring without measuring, mixing without fuss, always humming softly under her breath.
She never stressed about dessert. It was never about perfection. It was about creating something that brought people together—around the kitchen island, on a chilly Sunday morning, or wrapped up as a gift for a neighbor going through a hard time.
These crumb bars, humble as they are, have seen weddings, baby showers, funerals, birthdays, and quiet Tuesdays. They’re woven into our family’s story. And now, every time I bake them for my own children or bring them to friends, that story continues.
I remember once, when I burned the bottom of a batch, grandma just winked and said, “Honey, we’ll eat them upside-down.” That was her way: no drama, just sweetness and grace.
I hope when you bake these Grandma’s Apple Crumb Bars, you feel a piece of that same comfort. That slow, steady warmth that only a heritage recipe can deliver. Whether you keep the original, try the cranberry twist, or go caramel-drizzle crazy, you’re not just baking dessert—you’re keeping a memory alive.
So bake a pan, pour a mug of something hot, and share them with someone who needs a little love today. That’s the grandma way.
Conclusion
Grandma’s Apple Crumb Bars are more than a dessert—they’re a legacy. Whether you’re baking them for the first time or the fiftieth, they’ll bring comfort, joy, and maybe a few sweet memories along the way. Try them with a twist, make them your own, and don’t forget to share a few.
For other trusted versions and community tips, check out these time-tested recipes on Allrecipes Apple Squares and Allrecipes Apple Bars.
Frequently Asked Questions About Grandma’s Apple Crumb Bars
What kind of apples are best for apple crumb bars?
Granny Smith apples are classic for their tart flavor and firmness, but Honeycrisp and Braeburn also work beautifully in this recipe.
Can I freeze Grandma’s apple crumb bars?
Yes! Wrap tightly in parchment and freeze for up to 3 months. Thaw at room temperature or reheat in a low oven for 10–12 minutes.
How do I keep the crumb topping from getting soggy?
Make sure the apple filling isn’t too wet—add a bit of flour to absorb moisture—and always let bars cool completely before covering or cutting.
Are these bars better served warm or cold?
Both! Warm bars are soft and cozy; cold bars slice cleaner and are perfect for packed lunches or snacks on the go.
Can I make apple crumb bars gluten-free?
Yes. Swap all-purpose flour for a 1:1 gluten-free flour blend, and be sure your oats are certified gluten-free.
What’s the difference between apple pie bars and apple crumb bars?
Apple pie bars usually have a pie crust base and a custard-like filling. Grandma’s Apple Crumb Bars use a crumble-style base and topping with a fresher apple filling.