Cherry Cheesecake Lush Recipe – No Bake, Creamy & Easy Layers
Looking for an easy cherry cheesecake lush recipe that’s creamy, fruity, and perfect for every season? You’re in the right place. This no-bake layered dessert delivers everything you love about cherry cheesecake—but without turning on the oven. Whether you’re craving something indulgent for the holidays or need a make-ahead dessert for a party, this recipe’s layers of crushed golden Oreos, fluffy cream cheese, and sweet cherries hit all the right notes. In this post, we’ll cover how to make it, how to tweak it to your style, and how to store and serve it for any occasion.
Plus: If you love this cherry lush, you’ll definitely want to try our banana split fluff salad and no-bake blueberry cheesecake later!
Table of Contents
Table of Contents
A Slice of My Childhood: Where It All Began
I’m Chef Adriana, and this cherry cheesecake lush recipe is a dessert that lives deep in my heart—and my family recipe box. Every summer growing up, my grandma would make her own version of this lush during cherry season. Her rule was simple: no oven allowed. She’d crush cookies, whip cream cheese by hand, and layer everything into a magical cold dish that we couldn’t wait to slice. It wasn’t fancy, but it was perfect.
I’ve carried on her tradition, but with a few upgrades—like using golden Oreos instead of graham crackers, and Philadelphia cream cheese for that rich tang. Now, I share it with my own kids, who call it “cherry lasagna.” And I serve it to friends who request it before I even say hello.
This easy cherry cheesecake lush recipe combines the nostalgic flavors of classic cherry cheesecake with the simplicity of a no-bake format. You get that creamy cheesecake texture layered between fluffy whipped topping and a buttery cookie crust. It’s light, yet decadent. Sweet, but not overwhelming. And it’s incredibly easy to pull off.
You’ll find that this recipe fits right into your dessert rotation, just like it did in mine. Whether you’re hosting a birthday, a barbecue, or looking for something to bring to your next potluck, this lush dessert is a guaranteed showstopper.
For more crowd-favorite no-bake ideas, check out this strawberry pretzel salad or these no-bake pumpkin biscoff cheesecake bars.
Why This Cherry Cheesecake Lush Is a Must-Make Dessert
Layers of Flavor You Can’t Beat
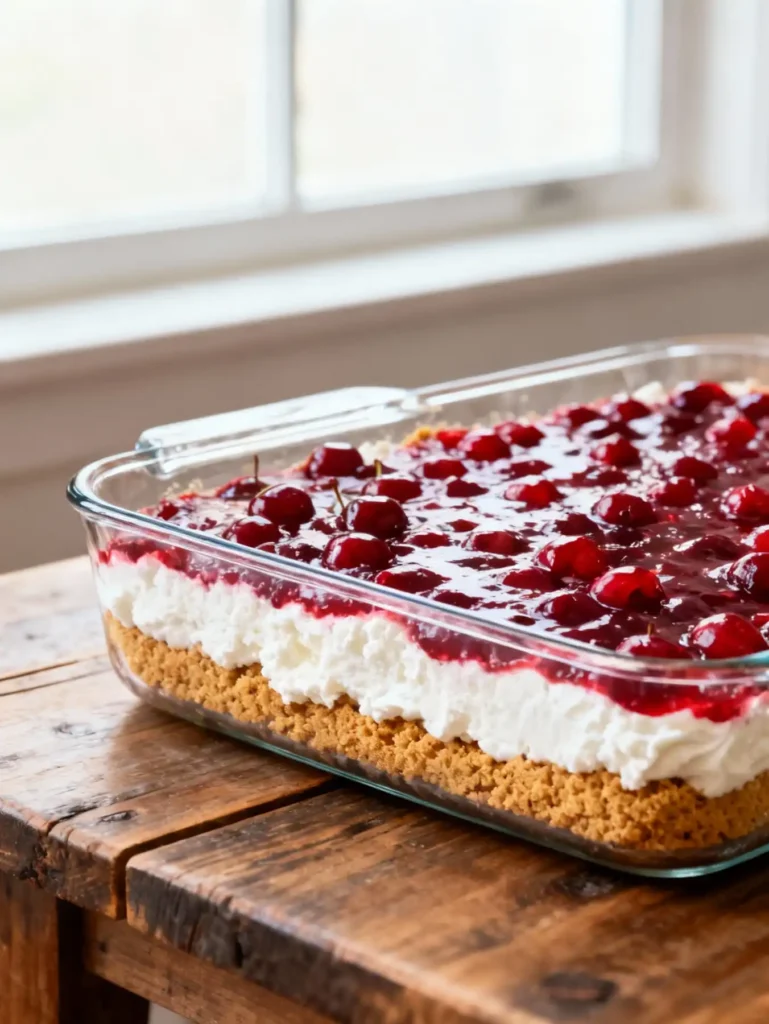
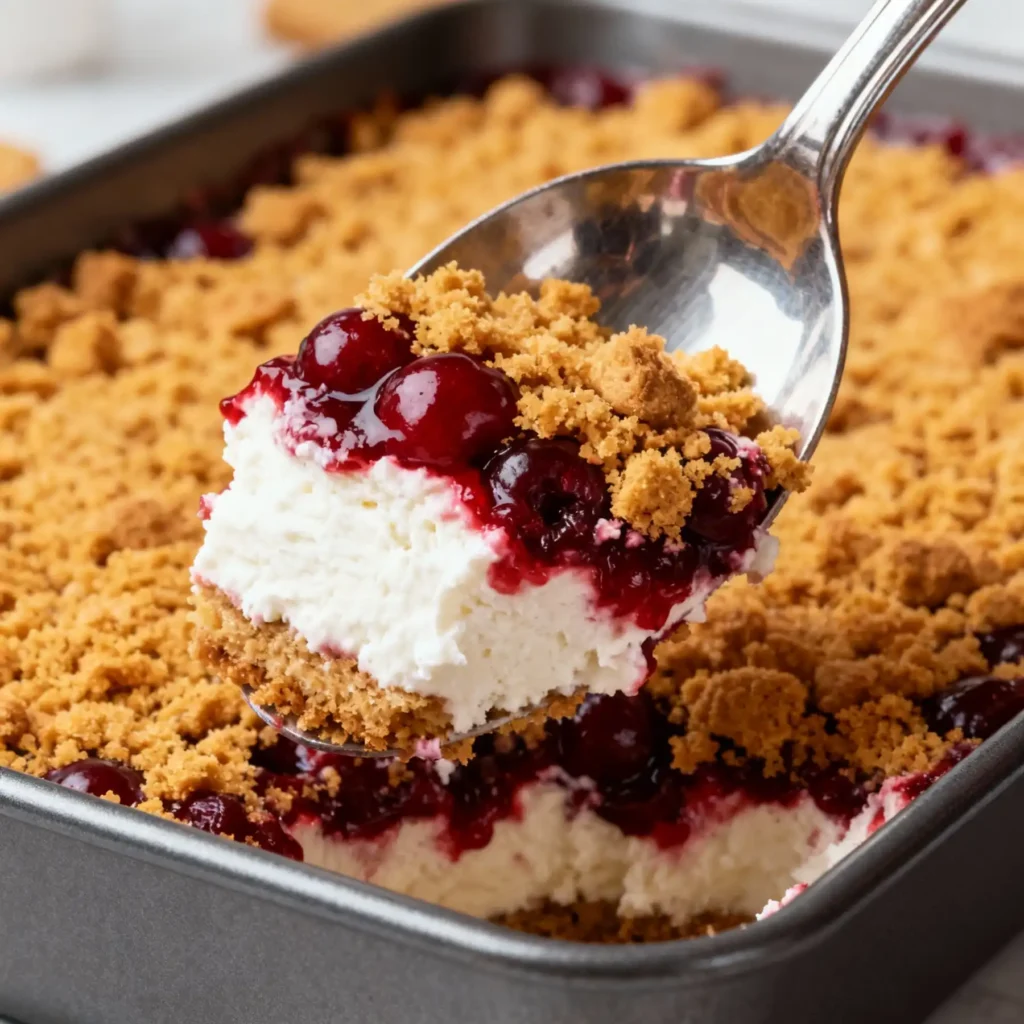
What makes this dessert a true lush? It’s all about the dreamy layers. Start with a golden Oreo crust that gives just the right crunch. Then comes a sweetened cream cheese filling, whipped until smooth and airy. The next layer? A silky topping of whipped cream or Cool Whip that lightens everything up. And finally—those glistening cherries on top. Canned cherry pie filling works great, but if you’ve got fresh ones, even better.
You don’t have to bake, wait, or fuss. Just layer, chill, and enjoy. It’s the kind of dish that makes everyone say, “Who made this?”
A Recipe That Fits Any Occasion
This cherry cheesecake lush is more than a pretty dessert—it’s flexible and fuss-free. Hosting a summer BBQ? Serve it in a big glass trifle dish to wow your guests. Holiday potluck? Make it the night before and let it chill while you relax. Need a patriotic twist? Use half cherry and half blueberry topping and call it a red, white, and blue lush (and while you’re at it, check out this 4th of July jello recipe).
Even picky eaters come back for seconds. And when it’s hot out, you’ll be glad you didn’t have to turn on the oven. That’s what makes this cherry cheesecake lush recipe a repeat performer in my kitchen—and soon, yours too.
Layers of Love – What Makes Cherry Cheesecake Lush So Special
The Perfect Layered Dessert Explained
When it comes to desserts, few things are as satisfying as cutting into a clean, structured layer and seeing every component standing tall. That’s exactly what you get with this cherry cheesecake lush recipe—a dessert that combines contrasting textures and flavors into one harmonious dish.
Let’s break it down:
- Base layer: A buttery crust made from crushed Golden Oreos adds a crisp, sweet foundation. Some versions use graham crackers, but golden Oreos bring a cookie-like richness that balances beautifully with the tang of the cream cheese.
- Cream cheese layer: This is where the cheesecake flavor lives. Softened Philadelphia cream cheese, powdered sugar, and whipped topping create a rich, airy layer that melts in your mouth.
- Whipped topping: Whether you use store-bought Cool Whip or homemade whipped cream, this layer keeps the dessert light and mousse-like.
- Cherry topping: The star! Canned cherry pie filling is convenient and delicious, but if you’re feeling fancy, try using homemade or organic versions for deeper cherry flavor.
These layers come together with no baking, no gelatin, and no eggs—just pure dessert joy. It’s this textural variety that makes every bite an experience.
Looking for other layered sensations? This mini cranberry pumpkin cheesecakes recipe delivers big flavor in small bites, and the no-churn mocha chocolate cookies ice cream adds a cold twist to the no-bake trend.
No-Bake Convenience + Creamy Cheesecake Texture
Let’s talk about the biggest selling point: you don’t need an oven. That’s why this cherry cheesecake lush recipe is a go-to for summer, holidays, and last-minute gatherings. Everything comes together in a single dish, and all you need is a fridge.
Compared to traditional baked cheesecake, which requires water baths, hour-long baking times, and risky cooling procedures to avoid cracks, this recipe gives you the same creamy satisfaction without the stress.
And let’s not forget about time savings. From start to fridge, this dessert takes less than 20 minutes to assemble. Then you chill it for a few hours or overnight, and it’s ready to impress.
If you’ve ever fallen in love with creamy desserts like orange creamsicle salad, this one will speak your love language—cool, creamy, fruity, and foolproof.
For a twist that stays in the no-bake family, try our no-bake peanut butter protein balls as a snack alongside this dessert. The contrast of healthy and indulgent might just be your new favorite balance.
Ingredients & Preparation Breakdown
Essential Ingredients (Golden Oreos vs Graham Crust Debate)
One of the biggest decisions in making a cherry cheesecake lush recipe is your crust choice. While graham cracker crusts are classic, Golden Oreos take this dessert to the next level. They bring extra sweetness and a buttery cookie texture that feels almost like shortbread. Here’s what you’ll need to bring this lush to life:
Crust Layer
- 36 Golden Oreos (crushed into crumbs)
- 1/2 cup unsalted butter, melted
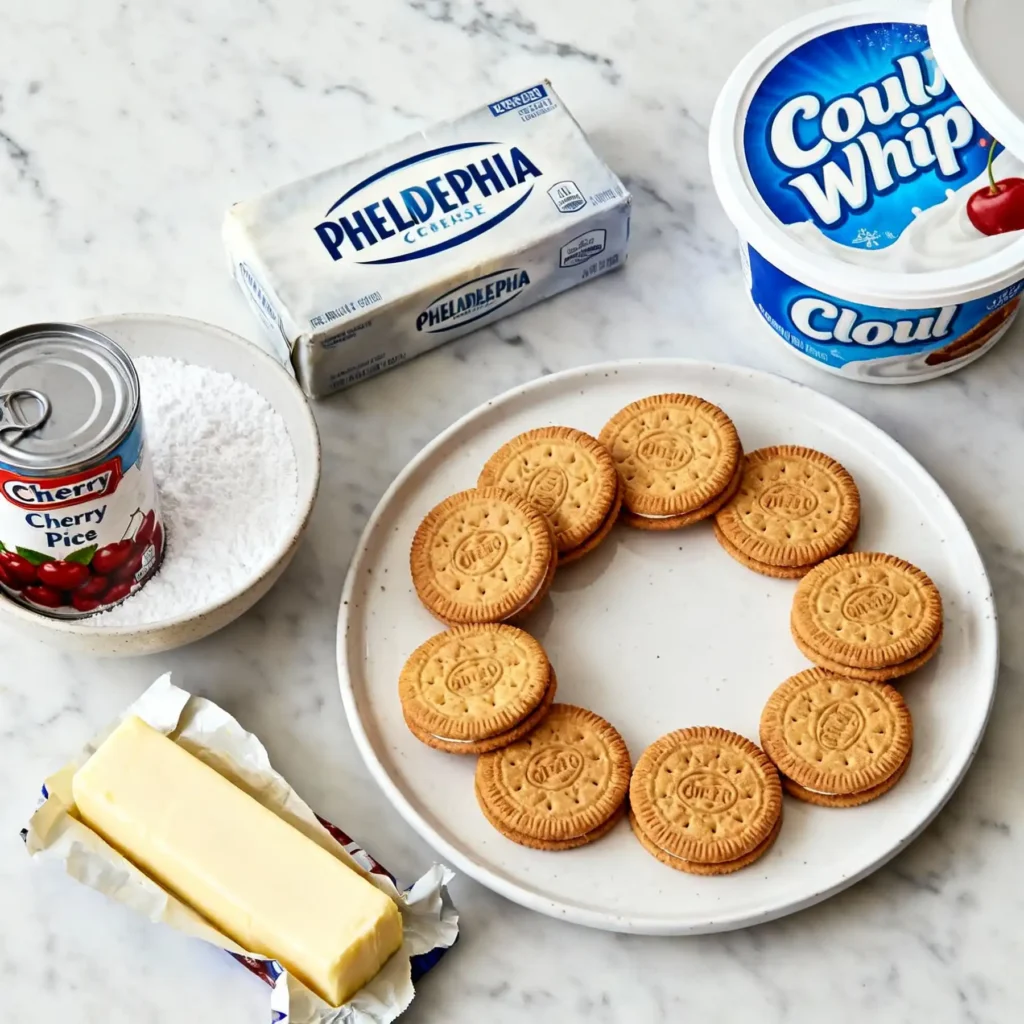
Cream Cheese Layer
- 2 packages (8 oz each) Philadelphia cream cheese, softened
- 1 cup powdered sugar
- 1 tsp vanilla extract
Whipped Layer
- 1 container (8 oz) Cool Whip or homemade whipped cream
Fruit Topping Layer
- 1 can (21 oz) cherry pie filling
- Optional: Fresh cherries for garnish
Why Golden Oreos? They add richness and a soft crunch that stands up well to the creamy layers. If you prefer graham crackers, go for it—it’ll be slightly less sweet but still delicious.
Need an alternative to pie filling? Try layering in a homemade cherry compote like we use in our cherry slab pie. It gives you more control over sweetness and texture.
Prefer something more playful? Switch cherries for strawberries like we do in the deep-fried strawberry cheesecake wontons, or even experiment with blueberry or lemon for a fun twist.
Step-by-Step Instructions (How to Assemble Your Lush)
Here’s how to assemble your cherry cheesecake lush like a pro:
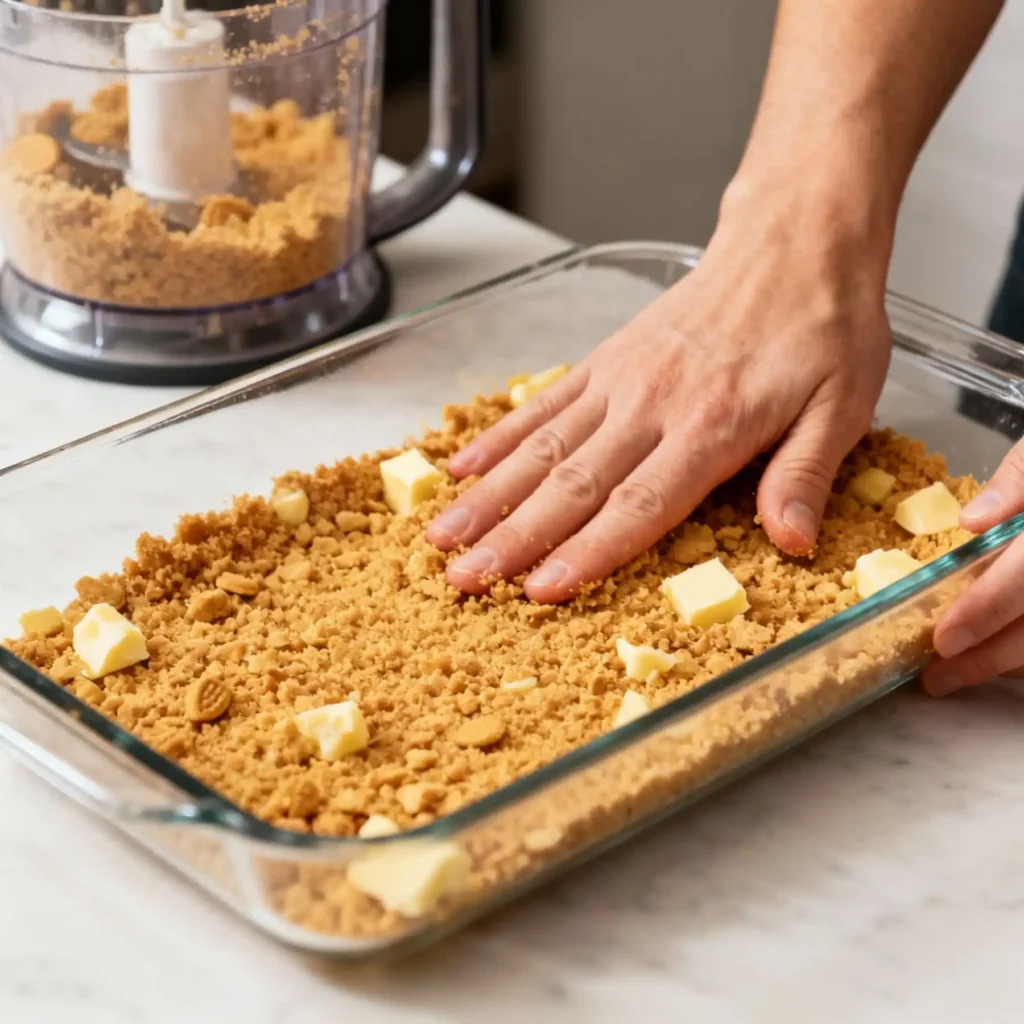
Step 1: Make the crust.
Crush the Golden Oreos into fine crumbs using a food processor or rolling pin. Combine with melted butter and press into a 9×13-inch baking dish. Chill while prepping the next layer.
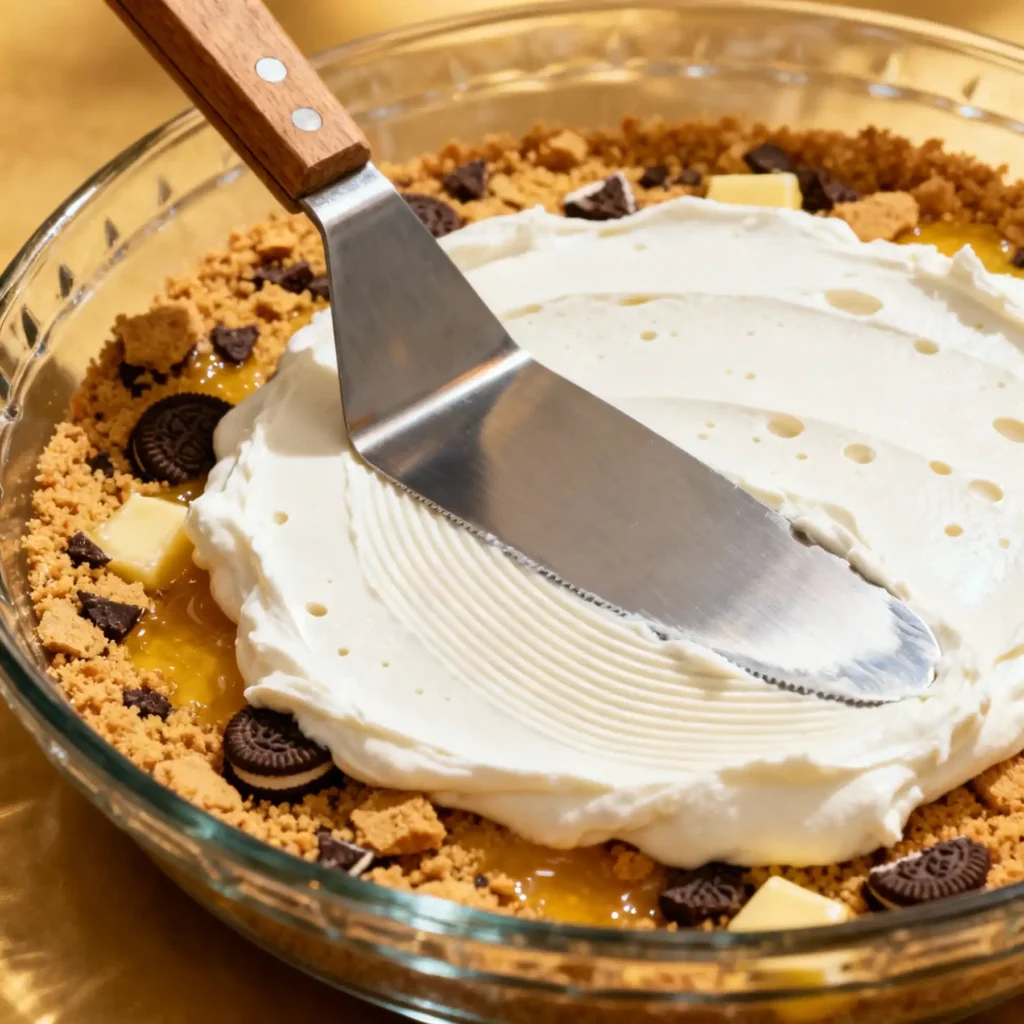
Step 2: Make the cream cheese layer.
Beat softened cream cheese, powdered sugar, and vanilla until smooth. Fold in 1/2 of the whipped topping gently. Spread over the crust.
Step 3: Add the whipped topping layer.
Spread the remaining Cool Whip evenly over the cream cheese mixture.
Step 4: Top with cherries.
Spoon cherry pie filling across the top, spreading gently to avoid disturbing the layers. Add fresh cherries if you like for extra pop.
Step 5: Chill.
Refrigerate for at least 4 hours, or overnight for best texture and sliceability.
Pro Tip: Use an offset spatula to smooth each layer evenly. If you’re serving for a party, consider prepping it in a glass trifle bowl to show off the gorgeous layers.
Want to mix up the look? You could take inspiration from our crispy cotton candy cheesecake bombs and roll into mini layered cups or jars for individual servings!
Pro Tips, Variations & Storage
Easy Variations (Oreo Swap, Strawberry Lush Twist)
One of the best things about a cherry cheesecake lush is how easy it is to customize. The base recipe is fantastic, but sometimes a small swap creates a whole new experience. Whether you’re changing it up for the seasons, dietary needs, or personal taste, here are my tried-and-true favorites:
Golden Oreo Alternatives:
- Try chocolate Oreos for a black forest twist.
- Go nutty with a Nilla wafer and pecan crust for added texture.
- Use crushed graham crackers if you’re going old-school.
Fruit Swaps:
- Strawberry pie filling creates a vibrant strawberry cheesecake lush, much like the flavors in this strawberry shortcake recipe.
- Use blueberry topping for a lush inspired by this no-bake blueberry cheesecake.
- Feeling adventurous? Spoon on some caramelized banana topping inspired by our banana upside-down cake.
Dietary Adjustments:
- Swap regular cream cheese for a light or lactose-free version.
- Use sugar-free whipped topping and low-sugar cherry filling for a lighter option.
- Gluten-free cookies can replace Oreos for a GF crust base.
If you enjoy playful desserts, give our funfetti dip or orange creamsicle dip a try too—perfect for parties and just as simple to whip up.
Storage Tips for Parties, Potlucks & Make-Ahead Prep
Can I make cherry cheesecake lush ahead of time?
Yes, and you should! This dessert needs to chill anyway, and it’s actually better the next day. Here’s how to store it right:
| Storage Method | Duration | Notes |
|---|---|---|
| In fridge (covered) | 3–4 days | Best eaten within 48 hours for freshest layers |
| In freezer | Up to 1 month | Wrap tightly with plastic & foil; thaw in fridge overnight |
| Individual portions | 2–3 days | Great for meal prep or personal treats |
Avoid soggy crusts: To prevent your crust from softening too much, press it down firmly and chill it for 30 minutes before adding layers. You can also spread a thin barrier layer of melted white chocolate on the crust and chill before adding the filling.
For serving, a chilled dessert like this travels beautifully. Just pop it into a cooler and you’re good to go—much like how we serve our smores cookie cups at picnics or potlucks.
Looking to feed a crowd? This dish scales up easily. You can double the recipe in a larger roasting pan or make two 9x13s side by side.
Serving Ideas, Pairings & Nutrition
How to Serve It Beautifully (Holiday, Everyday, Layer Display)
This cherry cheesecake lush recipe isn’t just tasty—it’s stunning on the plate. Whether you’re hosting guests or bringing dessert to a potluck, this no-bake treat makes a serious impression.
To serve it beautifully, use a glass baking dish so the layers shine through. You can even make it in a trifle bowl if you want a taller, showier version. The glossy cherry topping contrasts perfectly with the creamy middle and buttery crust below.
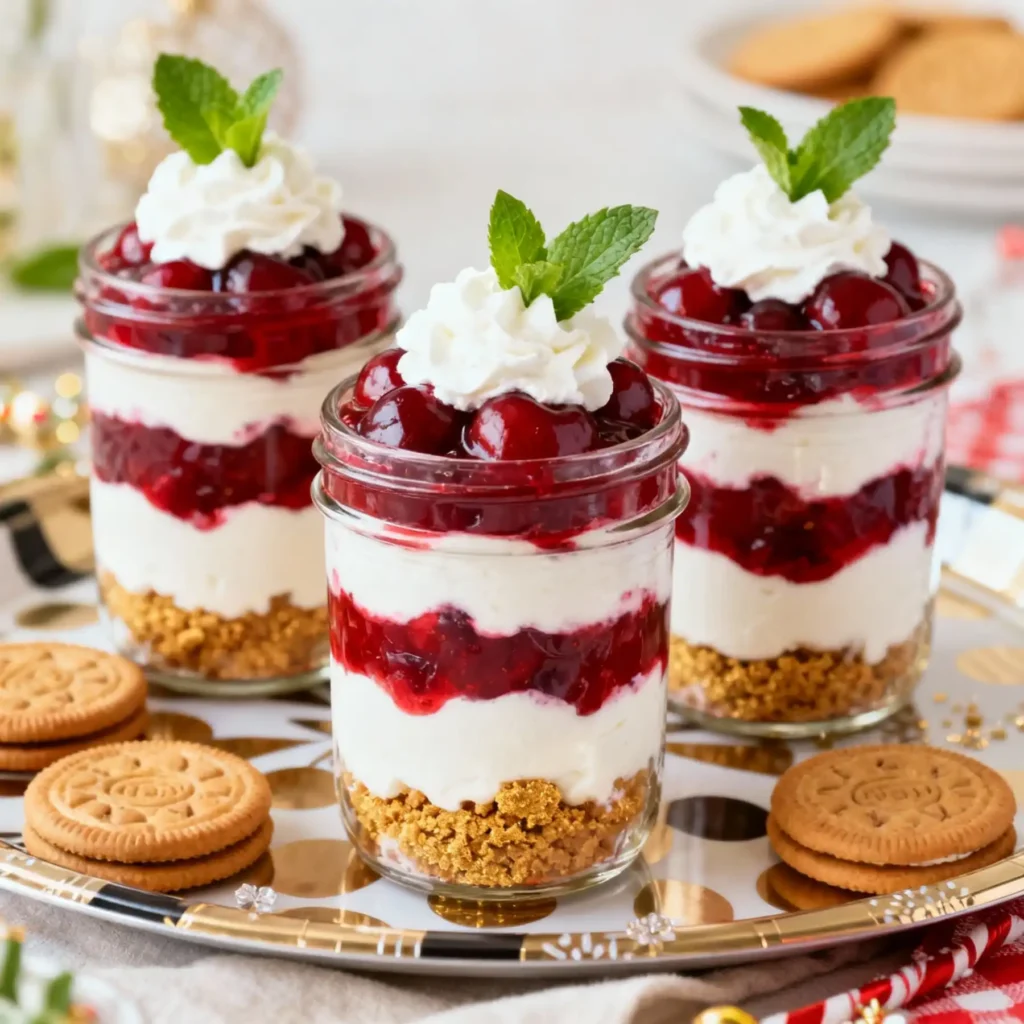
Hosting a party? Scoop it into mini dessert cups or mason jars for individual servings. This makes cleanup easier and the presentation extra festive. Garnish each with a fresh cherry and a mint leaf to impress every guest.
Planning a holiday table? Pair this cherry cheesecake lush recipe with a red theme for Christmas or Valentine’s Day. For the 4th of July, layer it with both cherry and blueberry filling like in our patriotic 4th of July Jello recipe for a festive spin.
Want more layered party desserts? Our buckeye rice krispie treats and no-bake pumpkin biscoff cheesecake bars both travel well and please crowds.
Nutrition & Substitution Table (Low Sugar, Gluten-Free, etc.)
If you’re wondering whether this cherry cheesecake lush recipe can be adjusted for different diets—yes, absolutely. Here’s a quick glance at how you can tweak it:
| Swap | Why It Works |
|---|---|
| Low-fat cream cheese | Cuts calories without losing creaminess |
| Sugar-free Cool Whip | Ideal for diabetic-friendly versions |
| Gluten-free sandwich cookies | Makes the crust safe for gluten sensitivity |
| Homemade cherry compote | Controls sugar and adds fresh cherry flavor |
This cherry cheesecake lush recipe isn’t designed to be low-calorie, but it can be adjusted for different needs. Here’s a rough estimate per serving (1/12 of recipe):
- Calories: 360
- Fat: 22g
- Sugar: 26g
- Protein: 3g
- Carbs: 34g
Want to push the flavor envelope even further? Try pairing your lush with a scoop of no-churn mocha chocolate cookies ice cream for a rich, decadent combo.
Or, serve with something contrasting—like the bright citrus of this orange creamsicle salad. The balance of fruit, cream, and crunch makes each bite interesting.
FAQs About Cherry Cheesecake Lush Recipe
What is cherry cheesecake lush made of?
This lush dessert is made from crushed Golden Oreos, sweetened cream cheese, whipped topping, and cherry pie filling. All layers are chilled—no baking involved.
Is cherry cheesecake lush a no-bake dessert?
Yes! This cherry cheesecake lush recipe is 100% no bake. Simply layer the ingredients and refrigerate until set.
Can I make cherry cheesecake lush with Oreo crust?
Absolutely. You can use Golden Oreos, chocolate Oreos, or even gluten-free sandwich cookies for the base.
How long does cherry cheesecake lush last in the fridge?
It stays fresh for up to 4 days when covered tightly. For best flavor and texture, eat within 48 hours.
Can I use homemade cherry pie filling instead of canned?
Yes! In fact, many bakers love to use homemade cherry compote for a more natural and tangy flavor.
What’s the difference between cherry lush and cherry cheesecake bars?
Cheesecake bars are typically baked and firmer. This cherry cheesecake lush recipe is a no-bake, scoopable dessert that’s lighter and more layered in texture.
Final Thoughts
This cherry cheesecake lush recipe is the kind of dessert that wins hearts, fills plates, and becomes a tradition. It’s simple to prepare, endlessly flexible, and always a showstopper at gatherings. With just a few ingredients and a chill in the fridge, you’ve got a beautiful, no-bake layered treat ready for any occasion.
If you loved this recipe, explore our other no-bake favorites like strawberry pretzel salad or our delightful no-bake peanut butter protein balls.
And for the original classic inspiration? See how AllRecipes does it here.
Print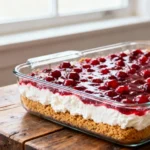
Cherry Cheesecake Lush Recipe
- Total Time: 4 hours 20 minutes (including chill time)
- Yield: 12 servings 1x
Description
This cherry cheesecake lush recipe is a no-bake, layered dessert that combines a golden Oreo crust, fluffy cream cheese filling, and a rich cherry topping. Perfect for holidays, potlucks, or casual gatherings, it’s easy to make ahead and always a crowd-pleaser.
Ingredients
- 36 Golden Oreo cookies, crushed
- ½ cup unsalted butter, melted
- 16 oz (2 blocks) cream cheese, softened
- 1 cup powdered sugar
- 1 tsp vanilla extract
- 8 oz Cool Whip (or whipped topping), thawed
- 1 can (21 oz) cherry pie filling
- Optional: Fresh cherries and mint leaves for garnish
Instructions
- In a mixing bowl, combine crushed Golden Oreos and melted butter. Press the mixture into the bottom of a 9×13-inch baking dish to form the crust. Chill while preparing the filling.
- In another bowl, beat the cream cheese until smooth. Add powdered sugar and vanilla extract; mix well.
- Fold in half of the Cool Whip until light and fluffy. Spread this mixture evenly over the chilled crust.
- Spread the remaining Cool Whip on top of the cream cheese layer.
- Carefully spoon the cherry pie filling over the whipped topping, spreading it evenly.
- Refrigerate the dessert for at least 4 hours, or overnight for best results.
- Garnish with fresh cherries and mint leaves before serving, if desired.
- Slice and serve chilled. Store leftovers covered in the fridge.
Notes
You can substitute Golden Oreos with graham crackers or chocolate Oreos for a fun twist.
For a lighter version, use reduced-fat cream cheese and sugar-free whipped topping.
This dessert is best served cold and can be made a day ahead.
- Prep Time: 20 minutes
- Chilling Time: 4 hours
- Cook Time: 0 minutes
- Category: Dessert
- Method: No-Bake
- Cuisine: American
Nutrition
- Serving Size: 1 slice
- Calories: 360 kcal
- Sugar: 26g
- Sodium: 210mg
- Fat: 22g
- Saturated Fat: 12g
- Unsaturated Fat: 8g
- Trans Fat: 0g
- Carbohydrates: 34g
- Fiber: 1g
- Protein: 3g
- Cholesterol: 45mg