This 4th Of July Jello Recipe has been a centerpiece of my Independence Day celebrations for as long as I can remember. Growing up, the sight of red, white, and blue blocks sparkling in a chilled dish meant family, fireworks, and that sweet burst of nostalgia only a holiday can bring. Learn more about building the ultimate patriotic dessert table in our 4th of July Jello cake guide. At Epsilon Community Hub, I’m all about sharing simple, party-ready sweets that connect generations.

Table of Contents
Table of Contents
What Makes This Patriotic Layered Dessert Special?
The Legacy of Red, White, and Blue Treats
Patriotic desserts aren’t just about color—they’re about connection. This classic gelatin dessert is a tribute to summer traditions, passed down from community potlucks and family picnics. With every layer, you’re not just crafting a treat—you’re reviving a piece of American celebration.
Layered gelatin desserts became especially iconic in mid-century America, when simplicity and creativity ruled the kitchen. They’ve stood the test of time because they’re versatile, affordable, and absolutely eye-catching.
Why Finger Jello Remains a Party Favorite
There’s a reason these wiggly treats keep showing up at cookouts. They are cool, light, make-ahead friendly, and ridiculously fun to serve. This red, white, and blue dessert gives you that perfect bite-sized mix of fruity flavor, creamy sweetness, and festive flair. It also holds up exceptionally well in the heat compared to heavy cakes or frosted cupcakes.
Print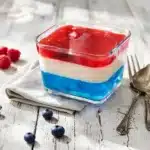
4th Of July Jello Recipe
- Total Time: ~4–5 hours
- Yield: 4–6 servings 1x
- Diet: Gluten Free
Description
This vibrant red, white, and blue 4th Of July Jello Recipe is the perfect patriotic dessert for your summer celebration. It’s colorful, creamy, and super easy to make ahead of time. Ideal for BBQs, family gatherings, or July 4th parties!
Ingredients
- 6 oz red Jello mix (1 box)
- 6 oz blue Jello mix (1 box)
- 14 oz can sweetened condensed milk
- 2 envelopes (0.25 oz each) Knox unflavored gelatin (0.5 oz total)
- 2 cups boiling water (per Jello color)
- ½ cup cold water (for blooming gelatin)
- 1½ cups boiling water (for white gelatin layer)
Instructions
1- Prepare Colored Layers:
Dissolve each Jello flavor in 2 cups boiling water (red in one bowl, blue in another). Stir until fully dissolved. Pour into separate 9×13 pans. Chill for at least 3 hours or overnight.
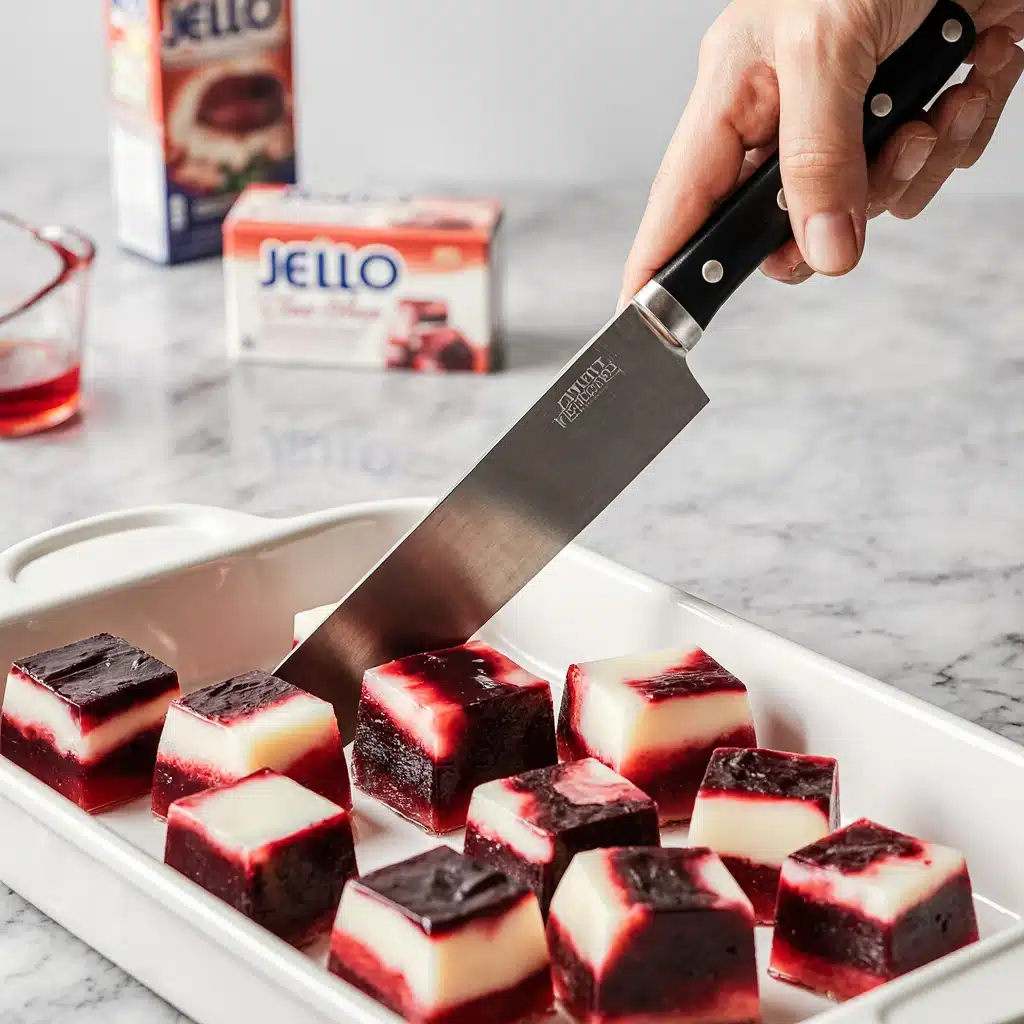
2- Cut & Combine:
Once set, cut both Jello layers into small cubes. Mix them gently in a clean 9×13 pan.
3- Create White Layer:
Bloom unflavored gelatin by sprinkling both packets into ½ cup cold water. Let sit for 2 minutes. Then, whisk in 1½ cups boiling water until gelatin dissolves. Add sweetened condensed milk and let cool to room temperature.
4- Assemble Final Layer:
Pour the cooled white gelatin mixture evenly over the Jello cubes. Chill for another 2–3 hours, until fully set.
5- Serve & Decorate:
Cut into cubes, stars, or shapes. Serve plain or top with whipped cream and fresh berries.
Notes
- For cleaner cuts, dip your knife in hot water between slices.
- To release from mold, dip the bottom of the mold in warm water for 10–15 seconds and invert onto a plate.
- You can add a Cool Whip layer or garnish with strawberries and blueberries for an extra patriotic look.
- Do NOT freeze. Refrigerate only.
- Prep Time: 5 minutes
- Chill/Set Time: 2–3 hours
- Cook Time: 2 hours
- Category: Dessert
- Method: Chill / No-Bake
- Cuisine: American, Summer
Nutrition
- Calories: 173 kcal
- Sugar: 32g
- Sodium: 138mg
- Fat: 2g
- Saturated Fat: 1g
- Carbohydrates: 33g
- Protein: 7g
- Cholesterol: 8mg
Ingredients You’ll Need for the Best Patriotic Jello
Main Ingredients and Substitutions
To make these colorful and creamy layers, you only need a few pantry-friendly ingredients. These are budget-friendly, widely available, and easy to work with.
- Red Jello mix (strawberry/cherry): 6 oz (1 box) for a bold red layer.
- Blue Jello mix (blue raspberry): 6 oz (1 box) for the classic patriotic look.
- Sweetened condensed milk: 14 oz can to add creamy, sweet flavor.
- Unflavored gelatin (Knox): 2 packets (0.5 oz) to set the white layer firmly.
- Water: Boiling and cold water used in different steps.
Discover how to keep your kitchen completely oven-free in our 4th of July icebox cake recipe.
Sweetened Condensed Milk vs. Cream or Cream Cheese
Some recipes call for heavy cream, cream cheese, or Cool Whip in the white layer, but sweetened condensed milk is the secret ingredient for maximum stability. It makes the white tier smoother and firmer thanks to less water content, and it sweetens the unflavored gelatin without grainy sugar crystals. That means you can confidently serve this dish at outdoor gatherings without worrying about it melting or separating.
Easy 4th of July Jello Desserts: Cups, Molds, and Finger Jello
Recommended Dishware and Formats
Making this sweet summer dessert doesn’t require fancy kitchen gear, but choosing the right mold completely changes the presentation. Check out our patriotic pretzel rods for a crunchy contrast to serve alongside these soft gelatin treats.
- The 9×13 Pan (Finger Jello): The easiest method. Pour layers into a flat pan and slice into cubes or use star-shaped cookie cutters.
- American Flag Molds: Use a flag-shaped silicone mold. Pour the blue layer in the canton (star area) and alternate red and white stripes.
- Layered Jello Parfait Cups: Perfect for individual servings. Build red, white, and blue stripes in clear plastic cups for a mess-free, portable treat.
Smart Prep for Easy Layering and Cutting
A little prep goes a long way when working with gelatin:
- Chill space: Be sure you’ve cleared space in your refrigerator for at least two 9×13 pans to sit flat.
- Stir well, but gently: Overmixing can create bubbles in the white layer. Under-mixing may leave clumps.
- Grease the pan lightly: A whisper of cooking spray (then wipe with a paper towel) helps release your final cubes cleanly.
- Plan ahead: Each layer takes time to chill—so don’t rush it. You can start the red and blue Jello a day ahead.
Step-by-Step: The Broken Glass Method for Patriotic Cubes
This festive technique looks complex but is surprisingly easy. Often called “Stained Glass” or “Broken Glass” Jello, the key is patience and fridge space.
Step 1: Dissolving the Red and Blue Blocks
Start by preparing your base colors in two separate bowls. Dissolve 1 box of red gelatin in 2 cups of boiling water, and 1 box of blue gelatin in 2 cups of boiling water. Pour each color into a separate 9×13-inch pan and refrigerate for at least 3 hours (or overnight). Once fully set, cut them into small squares using a sharp knife.
Step 2: Creating the Creamy White Binder
While your colored blocks chill, prepare the creamy white layer that holds everything together. In a small bowl, sprinkle 2 packets of unflavored Knox gelatin into ½ cup of cold water. Let it sit and bloom for 2–3 minutes. Add 1½ cups of boiling water and whisk until dissolved. Stir in the can of sweetened condensed milk and let the mixture cool completely to room temperature.
Step 3: Assembly and Chilling
Combine both your red and blue cubes in a clean 9×13-inch presentation dish. Mix gently for an even color spread. Slowly pour the cooled white milk mixture over the cubes. Chill for at least 2–3 hours until fully set, then slice into blocks! For more on refreshing summer sweets, explore our watermelon sorbet recipe.
Jello Mold Variations and Layering Ideas
Want to take your patriotic layered dessert to the next level? Let’s get creative with patriotic molds, festive shapes, and colorful layers that wow your guests before they even take a bite.
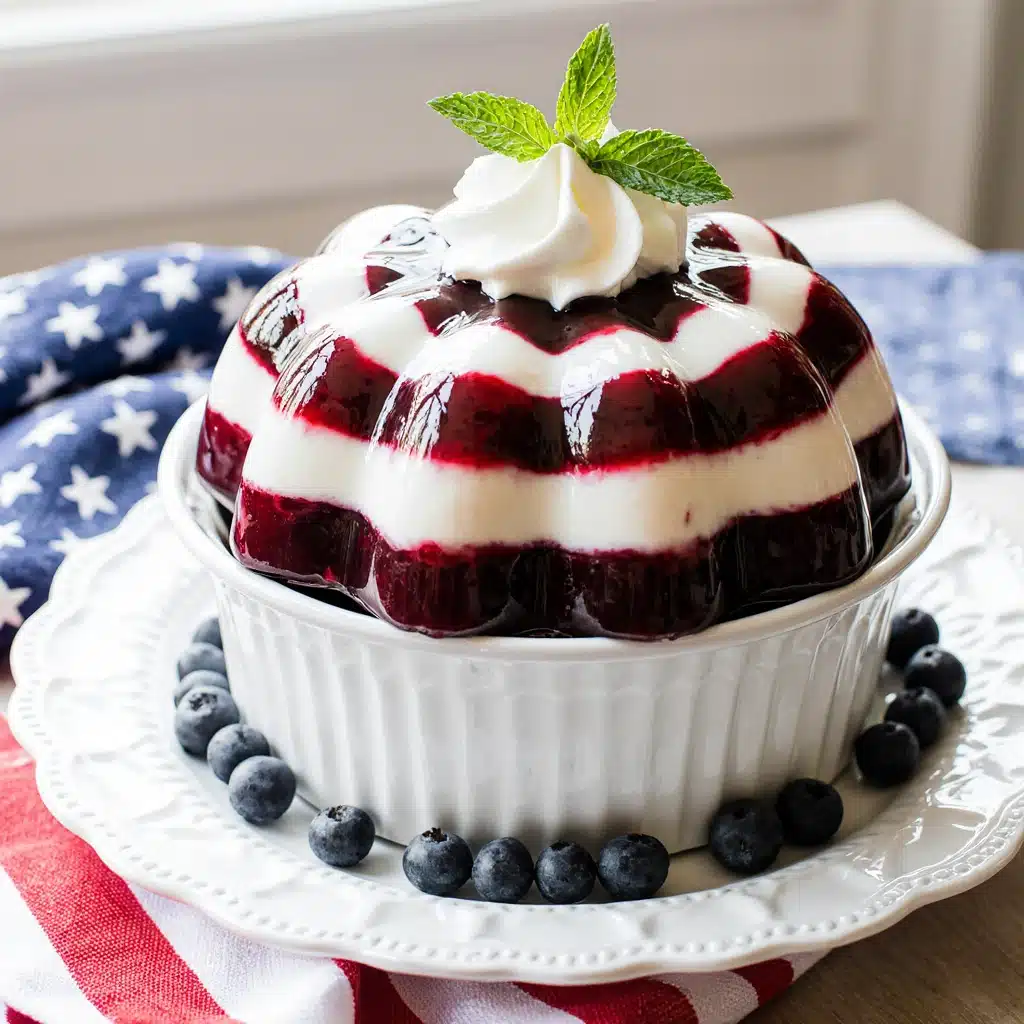
How to Use a Jello Mold Instead of a Pan
Using a Jello mold or bundt pan gives your dessert a fun, retro look and makes it easier to slice into rings or wedges.
Here’s how to do it:
- Lightly grease the mold with non-stick spray and wipe off excess.
- Layer the red Jello first, then chill partially (until set but not firm).
- Add a thin white gelatin-milk layer next, and refrigerate.
- Finish with the blue Jello layer and chill again until fully set.
- To release, dip the mold briefly in warm water and invert onto a plate.
This creates a beautiful, striped, red-white-blue effect!
If you prefer, you can also make mini molds using silicone cupcake trays or ramekins for personal-sized portions.
Creative Shapes and Patriotic Flag Designs
Feeling crafty? Try these ideas:
- Star-shaped cookie cutters: After setting, slice your Jello into fun star shapes for a true 4th of July feel.
- Layered flag layout: Pour alternating red and blue gelatin layers into a loaf pan, using thin white milk layers in between.
- Firecracker cups: Use small clear plastic cups to build individual layered desserts—great for parties or kids.
Pro Tip: Decorate with whipped cream, blueberries, or edible glitter just before serving for that extra sparkle!
Serving Suggestions for Your Patriotic Jello
Your 4th Of July Jello Recipe is set, chilled, and looking amazing—now it’s time to serve it in style. Whether you’re hosting a backyard BBQ, block party, or picnic in the park, presentation takes your dessert from “yum” to “wow!”
How to Plate, Serve, and Decorate Like a Pro
Here’s how to serve your red, white, and blue masterpiece with flair:
| Serving Style | Why It Works |
|---|---|
| Cut into cubes or stars | Easy to grab, great for kids, no utensils needed |
| Served in mini cups | Perfect for individual servings, no mess, very portable |
| Molded and sliced like cake | Elegant and retro—great for older guests or buffet bars |
| Layered in trifle jars | Showcases the colorful stripes in clear glass |
Don’t forget to chill your serving platter ahead of time to help keep the dessert cool outdoors!
Pairing With Whipped Cream, Fruit, or Sprinkles
Amp up the flavor and fun by adding simple garnishes:
- Cool Whip or fresh whipped cream: Light and fluffy contrast to gelatin texture
- Fresh berries: Strawberries, blueberries, and raspberries keep the patriotic theme going
- Edible glitter or sprinkles: Add sparkle and excitement, especially for kids
- Mint leaves: A refreshing finish and great contrast in color
These small additions turn a classic 4th Of July Jello Recipe into a dessert centerpiece everyone talks about.
Expert Troubleshooting & Make-Ahead Tips
How Far in Advance Can You Make It?
One of the biggest advantages of this no-bake dessert is that it is perfect for prepping in advance. You can safely make it 1–2 days before your party without losing quality. The flavors actually meld better when chilled overnight.
You can safely make this dessert 1–2 days in advance without losing quality. Here’s a simple timeline to follow:
| Time Before Event | What to Do |
|---|---|
| 2 days before | Make red and blue layers, let them set overnight |
| 1 day before | Add white milk gelatin, chill again overnight |
| Morning of party | Cut into cubes or shapes, garnish just before serving |
Storage Tips to Prevent Melting and Sogginess
Gelatin holds well in the fridge, but here’s how to extend freshness and avoid common pitfalls:
- Keep refrigerated until ready to serve. It should stay firm for 4–5 days.
- Use a sealed container or plastic wrap to prevent drying out.
- Do not freeze the Jello—it ruins the texture and can cause separation.
- If making individual cups or trays, store with lids to prevent spills in transport.
Why Was Jello So Popular in the 1950s? (Fun History)
There’s something charmingly nostalgic about a bright, bouncy 4th Of July Jello Recipe—and to understand its magic, we need to take a peek into the past. Back in the 1950s, Jell-O wasn’t just a dessert—it was a cultural icon.
The Nostalgia Behind Gelatin Desserts in American Homes
In post-war America, the kitchen was a place of pride. Families were embracing convenience, creativity, and celebration. And nothing screamed “modern hostess” like a molded, colorful gelatin salad sitting proudly on the dinner table. These jiggly wonders became the go-to for baby showers, church potlucks, and—yes—4th of July gatherings.
Why so popular?
- Inexpensive and shelf-stable
- Allowed for fun colors and layered designs
- Offered a way to add fruit, nuts, marshmallows, and even vegetables
- Fit beautifully into patriotic themes, especially red, white, and blue ones
Your modern finger jello still carries those cheerful, crowd-pleasing roots—only now with updated flavors, ingredients, and shapes that today’s guests will love just as much.
From Trend to Tradition: Jello’s Cultural Journey
Through the decades, gelatin-based desserts like this 4th Of July Jello Recipe have evolved, but their place at the American summer table is unchanged. They:
- Bring generations together with retro charm
- Appeal to all ages with their playful texture
- Are endlessly customizable—from fruit to whipped toppings
So, whether you’re recreating Grandma’s layered mold or putting your own twist on things with a flag-themed tray, this 4th Of July Jello Recipe is more than dessert. It’s a piece of American food history.
Troubleshooting Common Jello Mistakes
Even the most festive red, white, and blue treat can go sideways if a few small steps are overlooked. Luckily, most issues with gelatin-based desserts are easy to fix—or better yet, prevent.
Ratio of Gelatin to Liquid: How to Avoid Runny Layers
A common reason your 4th Of July Jello Recipe might not set properly? The wrong ratio of liquid to gelatin.
Here’s what you need to remember:
- Follow package directions for boxed Jello: 1 box (6 oz) = 2 cups boiling water
- For unflavored gelatin: 1 envelope (0.25 oz) usually sets about 2 cups of liquid
- Don’t eyeball it—measure precisely using a measuring cup
- Too much water = soft, unstable layers; too little = rubbery and overly firm
Tip: Always let gelatin bloom in cold water before adding hot liquid. This gives your 4th Of July Jello Recipe that perfect, clean finish.
Preventing Runny Layers and Breakage
A common mistake is rushing the assembly. We covered refreshing party beverages to match this color scheme in detail in our 4th of July mocktail masterclass. If you pour the white condensed milk mixture while it is still hot, it will immediately melt your carefully chilled red and blue cubes, resulting in a murky, muddy color. Always let the binding layer cool to room temperature before pouring.
Make This 4th Of July Jello Recipe a New Tradition
Whether you’re hosting a backyard barbecue, heading to a neighborhood potluck, or planning a family picnic, this 4th Of July Jello Recipe is the perfect make-ahead dessert. It’s easy, festive, and always a crowd-pleaser.
The vibrant red, white, and blue layers bring patriotic flair to your table, while the cool, creamy texture is just what everyone craves on a hot July day. Plus, it’s kid-friendly, nostalgic, and versatile enough to make your own with fun molds or fruit toppings.
So go ahead—start a new family tradition with this simple yet stunning recipe.
Frequently Asked Questions – 4th Of July Jello Recipe
Can I make this 4th of July Jello recipe with cream cheese or Cool Whip?
Yes! While sweetened condensed milk provides the firmest “finger jello” texture, you can blend 8 oz of softened cream cheese or fold in a tub of Cool Whip into your white gelatin layer for a fluffier, softer parfait-style dessert.
What is the ratio of gelatin to liquid for firm layers?
To get clean, sliceable blocks, you need a firmer set than standard package directions. Use 2 cups of boiling water per 6 oz box of flavored Jello (skipping the cold water addition). For the unflavored white layer, 2 packets of gelatin easily set the mixture of 2 cups water and 1 can of condensed milk.
How do you make a 3 layered Jello recipe without the colors bleeding?
The secret to distinct, sharp stripes in cups or molds is temperature control. You must allow each colored layer to chill in the refrigerator until it is “set but sticky” (about 45 minutes) before pouring the next layer. The liquid you are pouring on top must also be cooled to room temperature, never boiling hot.
Why did people in the 50s eat so much Jell-O?
Gelatin exploded in popularity during the 1950s because it was affordable, easy to make, and visually impressive. For families seeking convenience and style in one dish, molded salads and desserts became a staple of modern hosting.
What to make in a Jello mold?
A Jello mold allows you to create festive shapes for themed events. For Independence Day, use this 4th Of July Jello Recipe in a bundt or star-shaped mold to show off red, white, and blue layers. You can also add whipped cream, berries, or edible glitter for extra flair.
Don’t miss our summer fruit salad — it covers a lighter, fresh alternative to finish off your holiday menu.
Keep discovering new flavors Follow Chef Adriana on Facebook